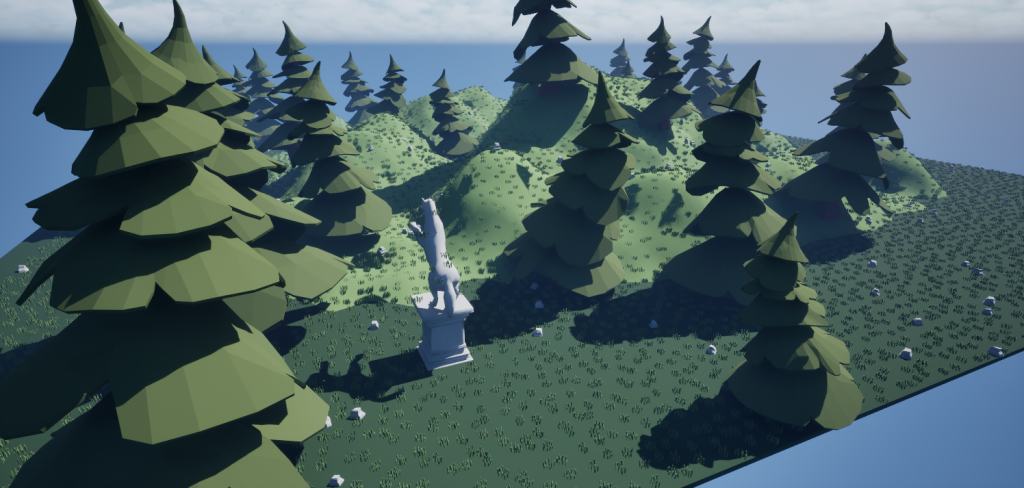
Welcome to the Essential Unreal Engine 5 Blueprints repository, your go-to source for a diverse collection of vital Blueprints tailored for Unreal Engine 5.3.2. This meticulously curated collection offers a range of essential Blueprints, making it easier to enhance your UE5 projects with advanced camera dynamics, seamless transitions between perspectives, and immersive combat views, all based on Epic Games’ versatile third-person template.
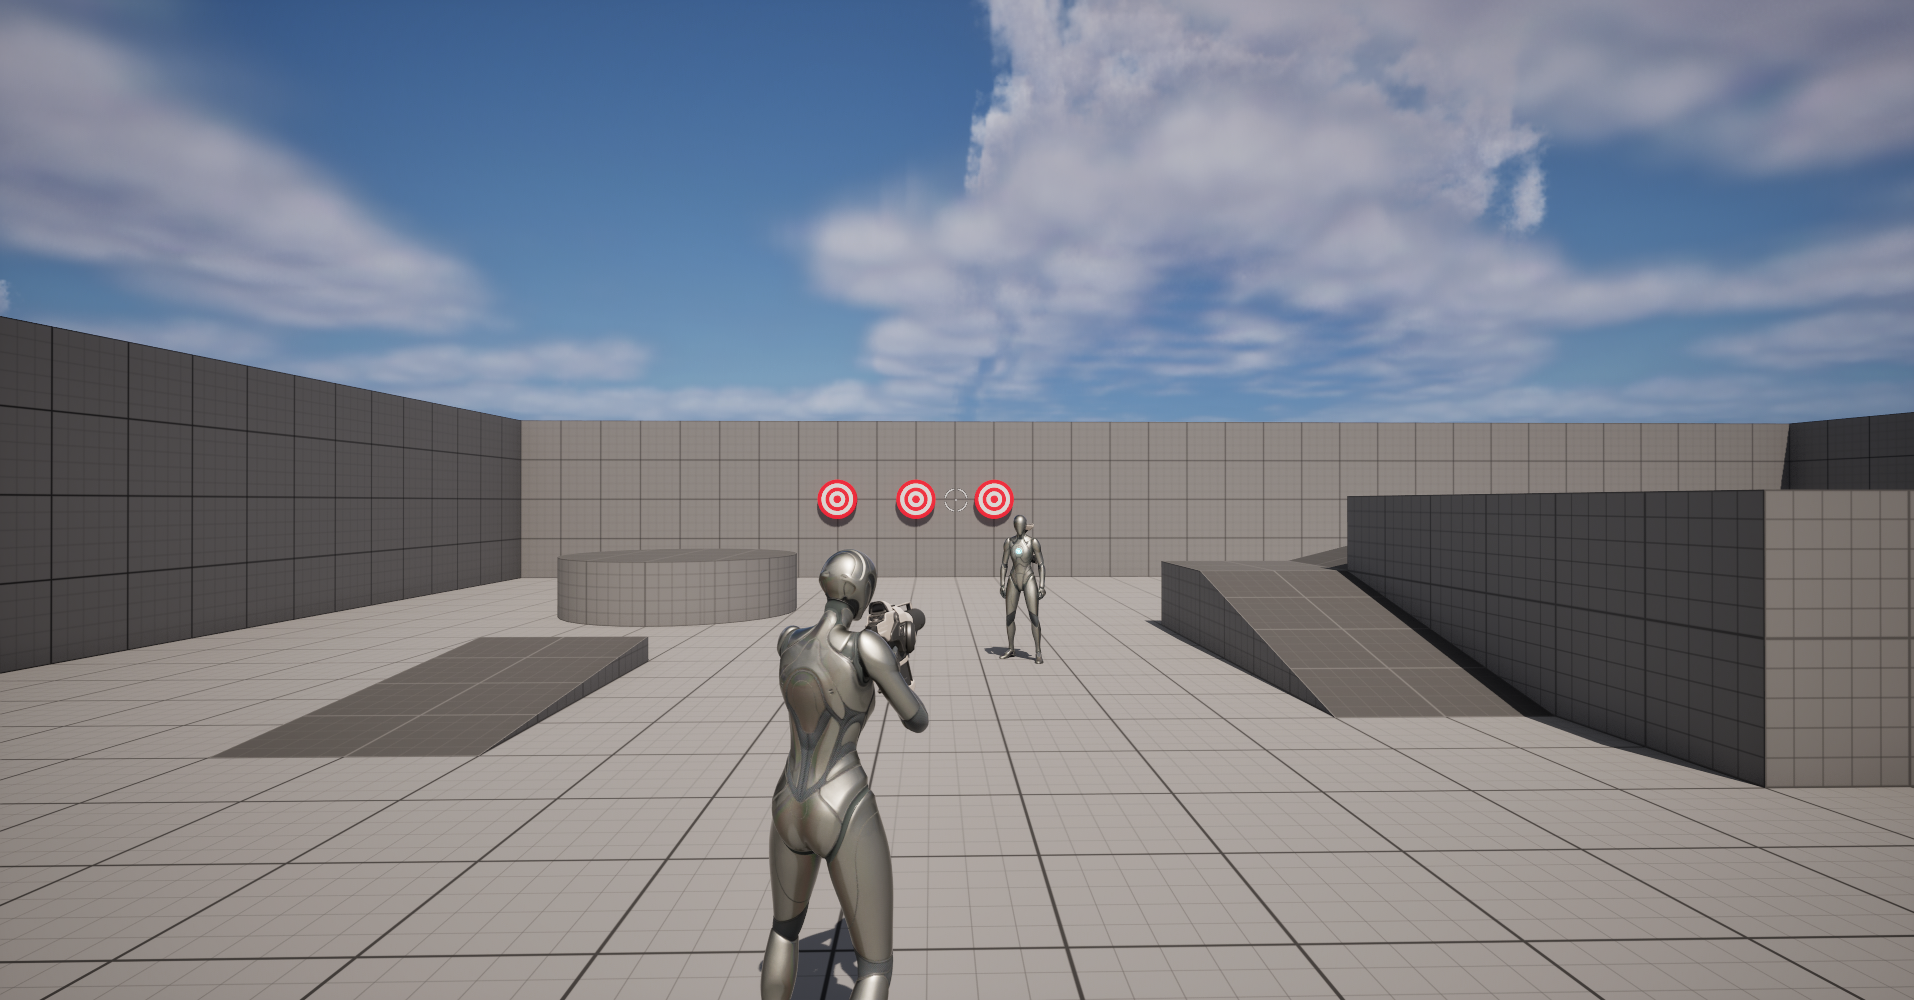
Enhanced Camera Dynamics: Elevate your game with third-person zoom, first-person transitions, and over-the-shoulder views for an engaging player experience.
Upcoming Features: Stay tuned for utility Blueprints, realistic swimming and flying mechanics, an interaction system, and comprehensive multiplayer replication to enrich your UE5 projects.
Seamless Integration: Easy to clone and integrate, these Blueprints are designed to be straightforward and modular.
Join our growing community by contributing to the EssentialUE5BPs repository. Whether you’re looking to add new features, refine existing ones, or have questions, we encourage you to engage in the comment section of our page. Let’s collaborate to push the boundaries of what’s possible in game development with Unreal Engine 5
In the fast-paced world of game development, managing the multitude of assets and code files efficiently is crucial. Unreal Engine 5 (UE5) is a powerful tool for creating stunning interactive experiences, and when paired with Perforce Helix Core, it provides a robust version control system that enables teams to collaborate effectively. This article guides you through the process of integrating Unreal Engine 5 with Perforce Helix Core for version control.
Why Use Perforce with Unreal Engine 5?
Before diving into the setup, let’s understand why integrating Perforce with UE5 is beneficial for your development workflow:
Versioning: Keep track of every change, allowing you to revert to previous versions if something goes wrong.
Asset Management: Efficiently handle large binary files, which are common in game development with UE5.
Collaboration: Perforce allows multiple team members to work on the same project simultaneously without overwriting each other’s work.
Stability: Perforce is known for its robustness and ability to handle large-scale projects.
One File Per Actor:
Prerequisites
Unreal Engine 5: Installed and running on your system.
Perforce Helix Core Server: Set up and accessible. You can refer to the this article on installing and setting up a Perforce Helix Core server on CentOS or Red Hat Enterprise Linux.
P4V: Perforce Visual Client installed on your system.
Step-by-Step Guide
Deciding on Depot Storage Location
Before creating a Streams Depot, it’s essential to decide where your depot files will be stored. There are two main scenarios:
If you need to set a custom location for the depot:
Custom storage locations are ideal when you have a dedicated storage drive or want to organize your depots outside of the default P4ROOT directory. To set a custom location, you’ll need to use the CLI. This approach allows you to specify an external directory, which can be on a different drive or partition designed for bulk storage, offering better performance or more space.
If you are using the default Helix Core settings where P4ROOT is also the main storage drive:
In many cases, especially for smaller setups or testing environments, using the default P4ROOT directory for depot files is sufficient. This method is straightforward and requires less configuration. The depot files will reside within the Perforce server’s root directory, typically alongside server metadata and journal files.
Creating the Depot
For Custom Location:
Open CLI: Access the command-line interface on the machine where your Perforce server is hosted.
Here’s how you can create a new stream depot and specify its location using CLI commands:
p4 depot [newdepotname]
# In the depot specification file, set:
Type: stream
StreamDepth: 1
Map: /bulkstorage/[newdepotname]/...
Note: You cannot change a depot’s type (local, stream, etc) after it’s created, so make sure to enter the correct information on creation. Also,make sure to replace [newdepotname] with the actual name of your depot.
For Default P4ROOT Location:
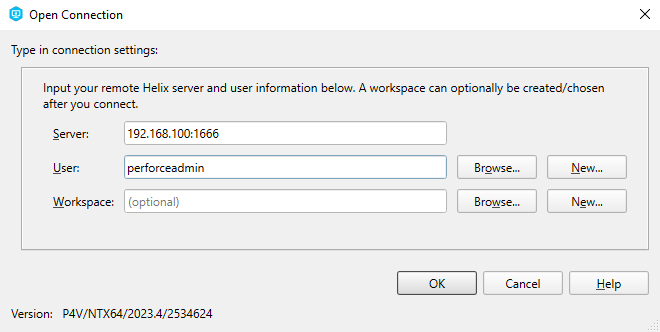
Launch P4V: Open the Perforce Visual Client on your system and connect to your server.
Enter your Perforce Helix Core server information [serveraddress:portnumber] and Perforce admin user credentials and click OK.
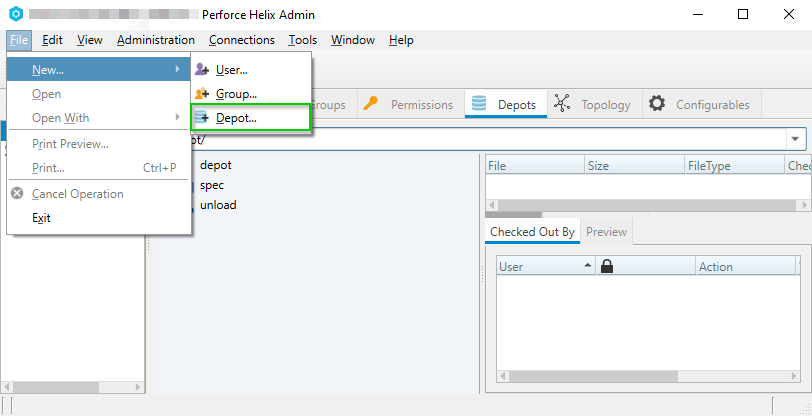
Open P4 Admin: Select Tools -> Administration then click on the Depots tab to view your current depots.
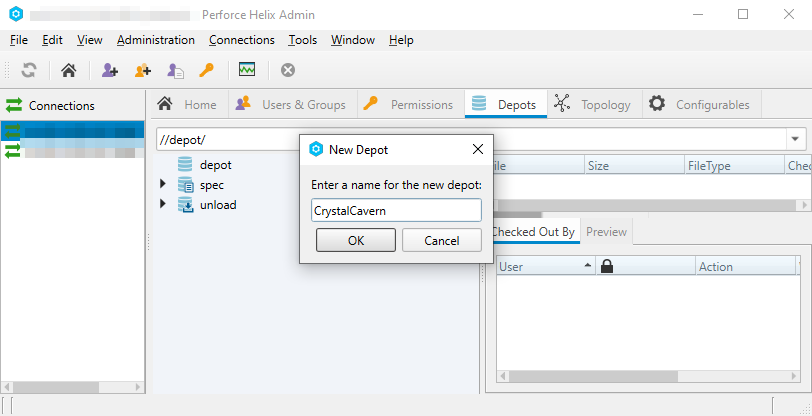
Create a New Depot: In the Perforce Helix Admin window, select File -> New Depot or by pressing CTRL + N to create a new depot.
Enter a name for the new depot. In general, we want to have one depot per Unreal Engine project, so it makes sense to name the depot after your UE5 project. Press OK to continue.
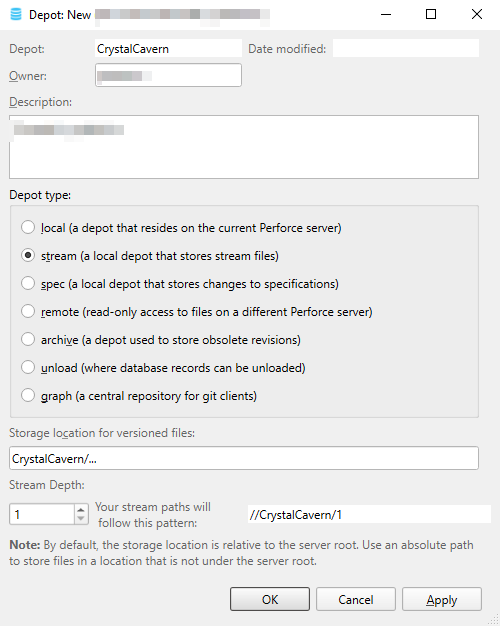
A new window will appear where we can specify the settings for the new depot. Select stream as depot type and click OK to create the new depot.
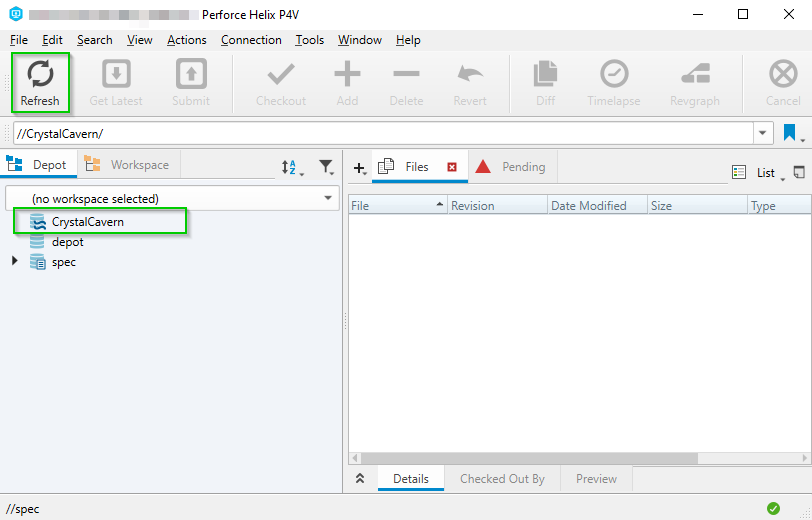
Close the P4 Admin window and select the main P4V window. Click the Refresh button and your new depo will appear in the Depot tab.
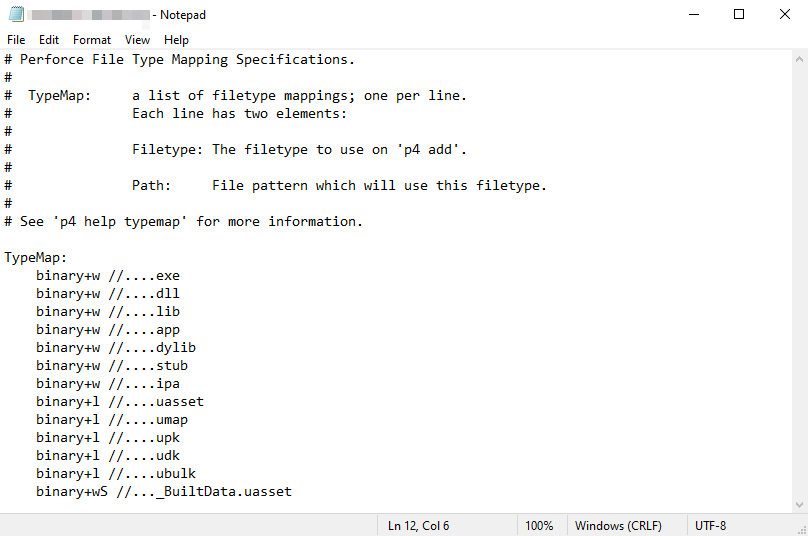
Creating a TypeMap: We will edit the TypeMap file to use TypeMap Modifiers in order to enhance the functionality of using Helix Core with Unreal Engine 5. We will be enabling the following modifiers:
+l (lower case L): Automatically locks files so multiple users can’t edit them as the same time. This is to primarily prevent binary files (levels, 3d models, etc…) from having merge conflicts — It allows only one person to work on a specific binary file at a time.
+w (lower case W): Allow files to be always writeable. Bypasses read-only files. Allows the OS to write to files that would otherwise be read only (log files, etc…).
+S (upper case S): Only store latest revision, instead of every single revision of the file. You can also specify how many file revisions to keep, by adding a number after the +S like so: +S4. This will save 4 revisions of each file.
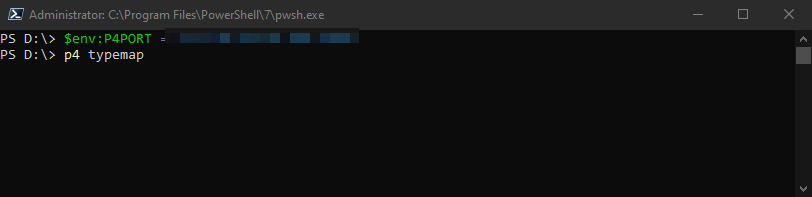
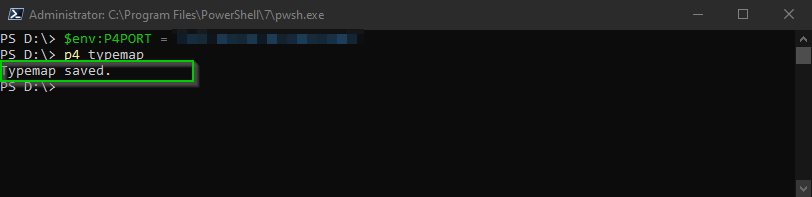
Open an elevated PowerShell, and login to your perfect server and entering the p4 typemap command:
Note: Make sure to replace `[perforce-server-ip-address]` with the IP Address or DNS name of your Perforce server.
This will open the TypeMap file in Notepad. The official Perforce Helix Core documentation provides a Sample Unreal Engine TypeMap configuration file for us to use with Helix Core:
Replace TypeMap section in the P4 TypeMap file with the sample configuration provided above, like so:
Save and close the TypeMap file and confirm that the Cmd or PowerShell printed “TypeMap saved.”
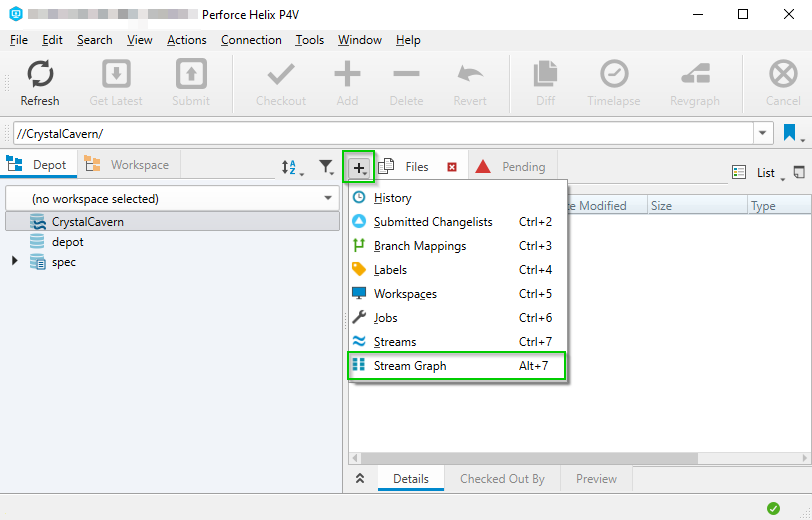
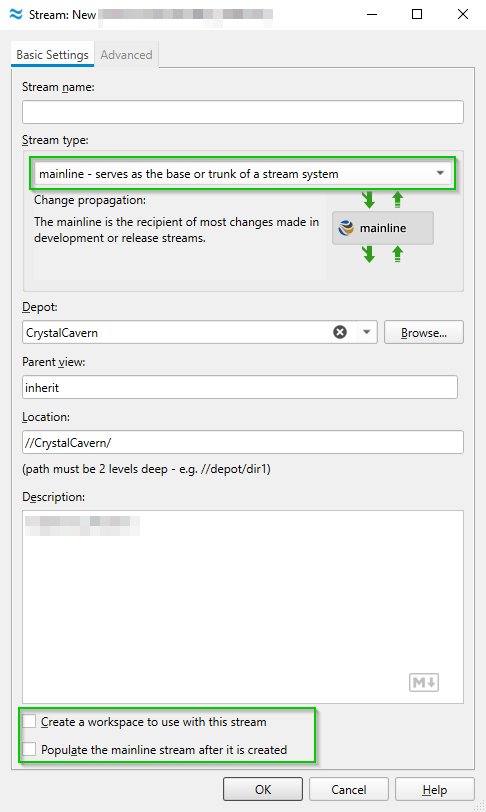
Creating a new Mainline Stream
In Helix Core, since we are using Streams depot, we need to setup a Mainline Stream. Streams are similar branches in git and we require a Mainline stream similar to how git requires a base branch.
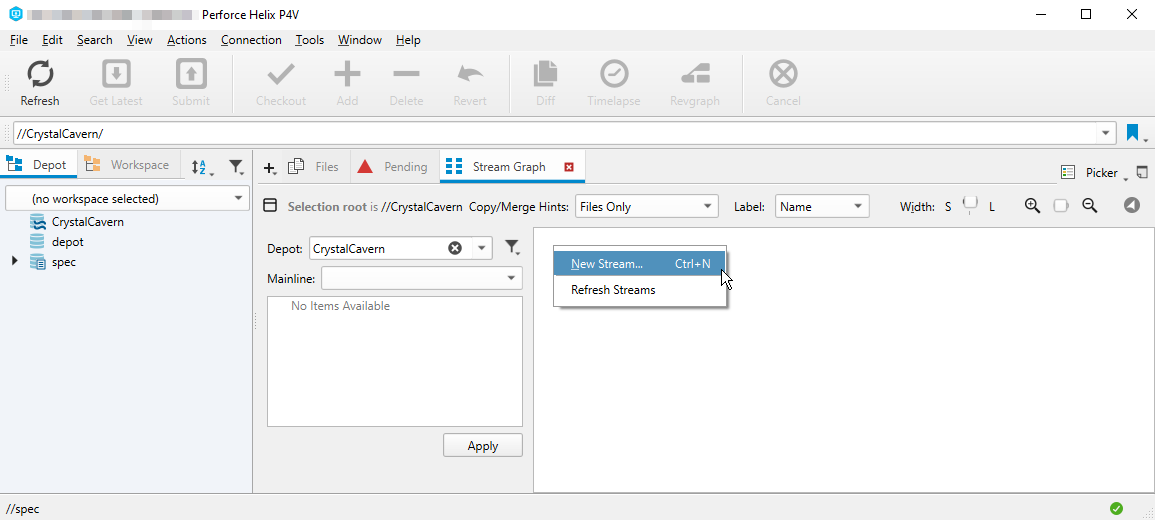
Open the Depot’s Stream Graph: Select your depot in the main P4V window and click the + icon and select Stream Graph or press ALT + 7. The Streamgraph tab will open.
Create a new Stream by Right-clicking in the whitespace of the Stream Graph tab and selecting New Stream… or by pressing CTRL+N.
Provide a Stream name, such as Main and under Stream type make sure that mainline - serves as a base or trunk of a stream system is selected.
We want to be able to manually configure the location of the workspace, so we will uncheckCreate a workspace to use with this stream and Populate the mainline stream after it is created. Click OK to create the Mainline Stream.
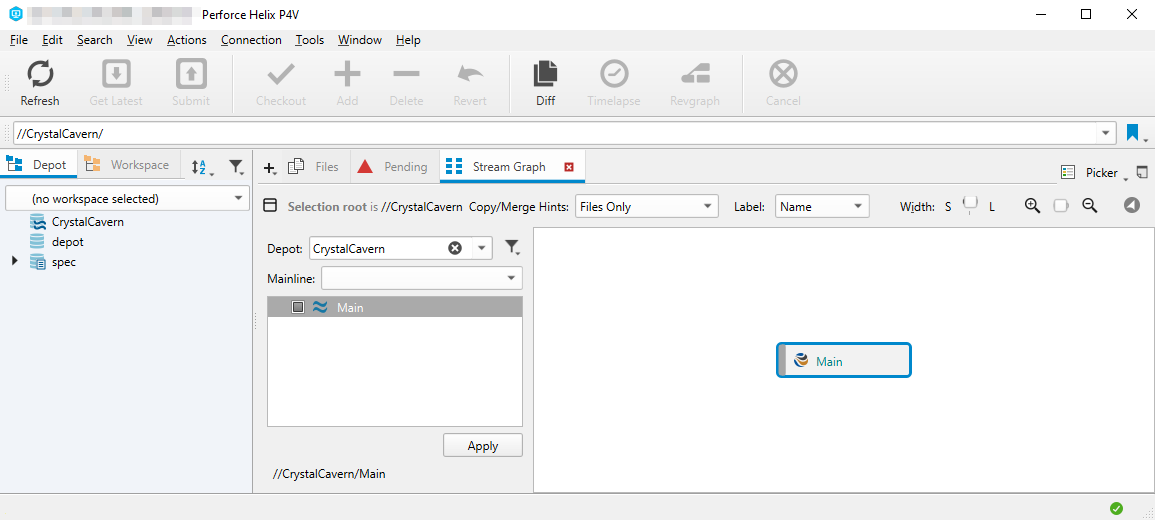
The new Stream will now be visible in the Stream Graph.
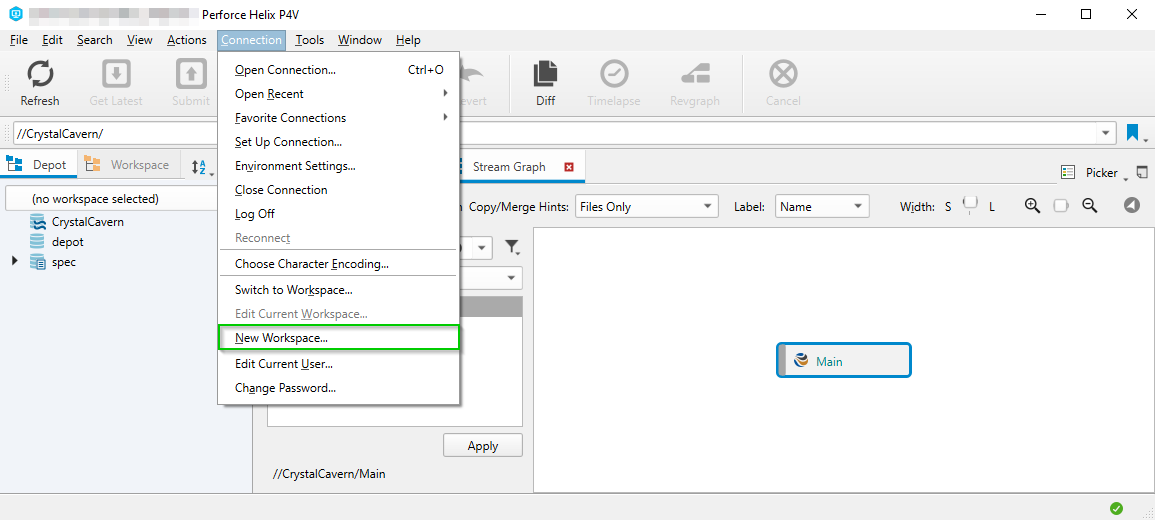
Setting Up Your Perforce Workspace
Create Workspace: A workspace (or client) is a personal copy of the files from the server, which is mapped to a local directory where your UE5 project resides. To create a workspace do the following:
1. On the top toolbar, select Connection -> New Workspace...
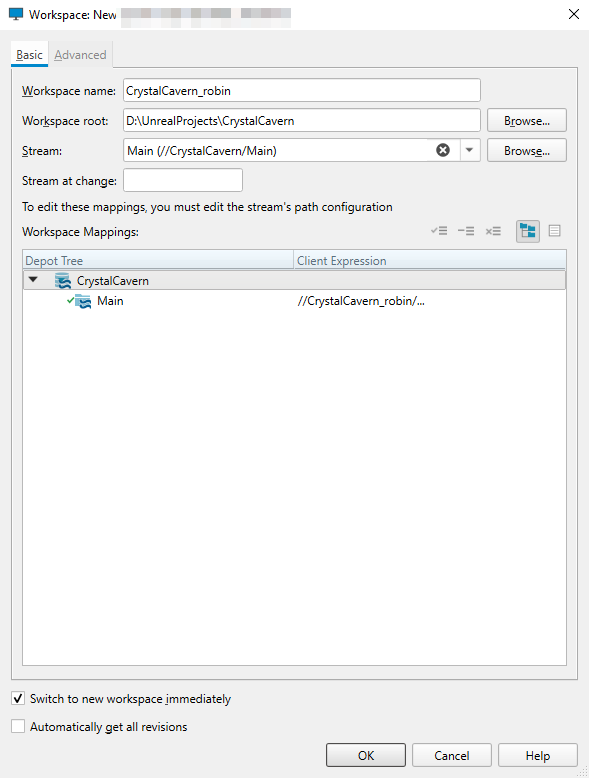
2. Provide a name to your workspace, such as MyProject_[username].
Note: Workspace names are visible to others on the same Perforce server. It’s beneficial to establish a consistent naming convention across your team. For example, you might use the format [ProjectName]_[Username].
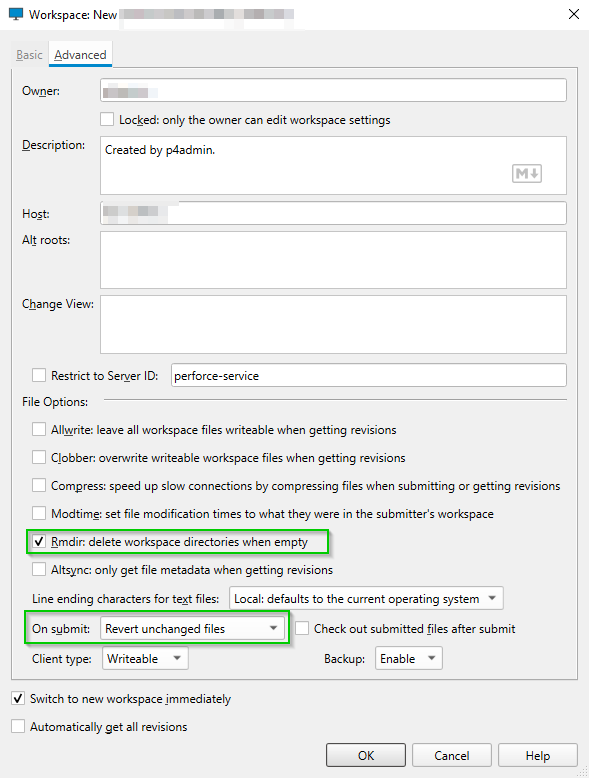
3. To setup the workspace root, select Browse… then navigate to the root folder of your workspace. The workspace root is the local directory on your machine where the files from the server will be stored. For instance, if your project is located at C:\UnrealProjects\MyProject, that’s what you would set as your workspace root. This setup ensures that the files you manage in Perforce correspond directly to your local UE5 project files. Also select the Main stream of the depot to the one we created earlier.
4. Switch over to the Advanced tab in the workspace window, and be sure to check Rmdir: delete workspace directories when empty .
Lastly, change the On submit option to Revert unchanged files. The default setting,Submit all selected files, commits all files that a user has checked out, regardless of whether they were modified. By opting for Revert unchanged files, we are telling Perforce Helix Core to only commit the files that were modified during the checkout process and to revert (uncheck) any files that remained unchanged. This approach ensures that only specifically altered files have their revision counts incremented, maintaining a clean and accurate record of changes and avoiding unnecessary revisions of unmodified files.
Click OK to finish creating the new workspace.
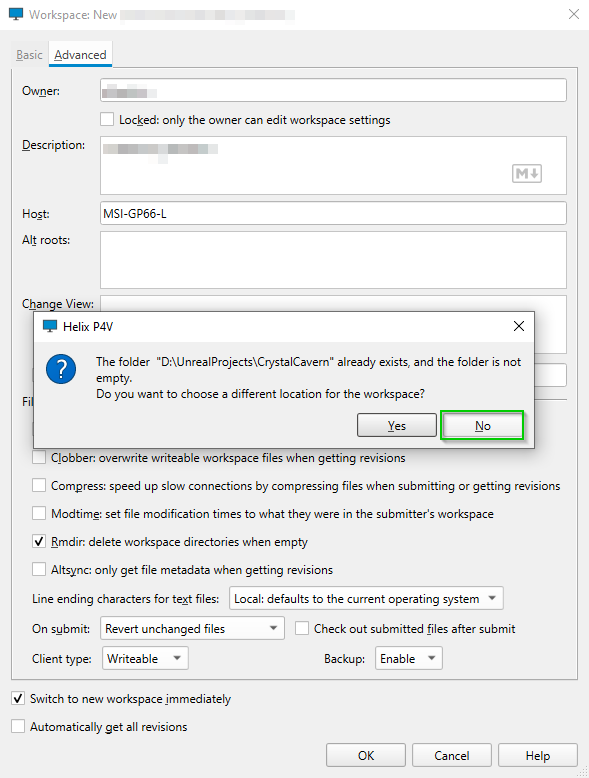
5. If your Unreal Engine project already exists in workspace root location, you will get prompted that the folder is not empty, and asked if you would like to choose a different location for the location. Select No as we want to use the selected workspace root.
If you created a new (empty) directory as the workspace root, you would get prompted to either Copy files from the local file system or Branch files from the server's depots. You would select Cancel here as we want to add an ignore file before we add files to the workspace.
Creating a P4Ignore File
We need to create a P4Ignore file so that our repository ignores certain files, directories, etc… This file functions similarly to the .gitignore in Git. By listing paths, patterns, file types, and more in the P4Ignore file, Helix Core will disregard these specified items, preventing them from being included in the source control.
1. Open an elevated command prompt, and set the P4IGNORE variable in Perforce, by entering this command:
p4 set P4IGNORE=.p4ignore
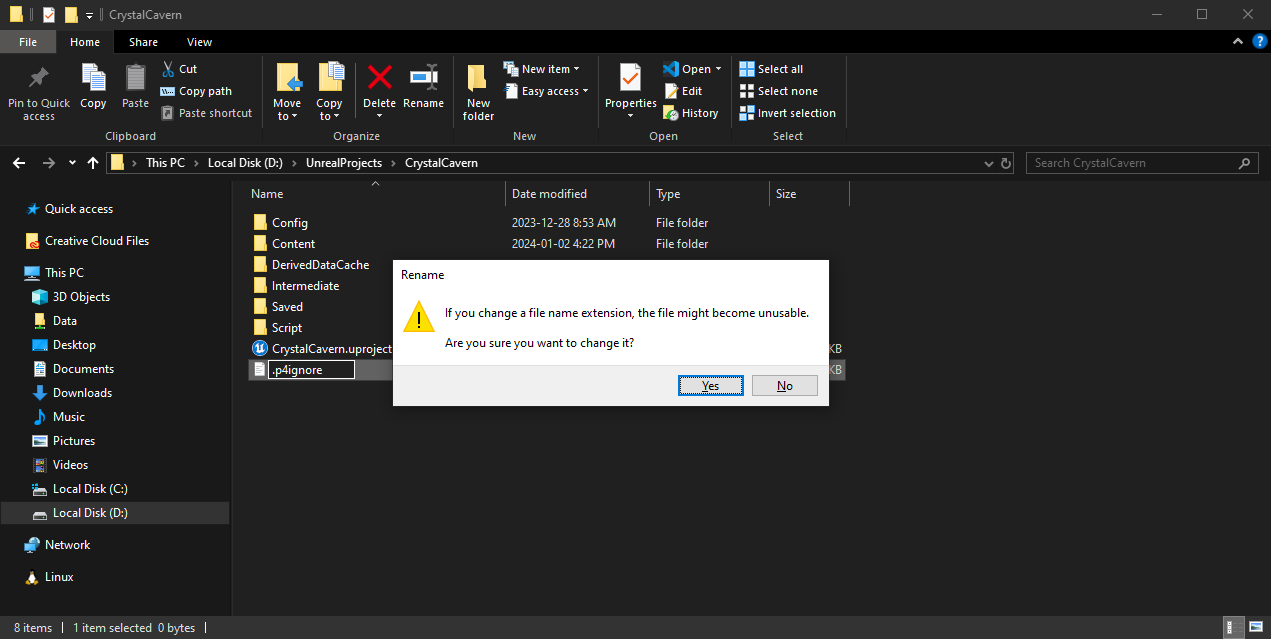
2. Open Windows file explorer, navigate to your workspace root directory and create a new file named .p4ignore. It’s crucial that this file has no file extension and matches the variable name exactly. On Windows 10/11, the simplest method is to create a new text document within your workspace root. Rename it to ‘.p4ignore’, ensuring you delete the ‘.txt’ extension. Windows will prompt a warning about changing the file extension possibly making the file unusable – this is normal. Confirm by selecting Yes, which finalizes the creation of your ‘.p4ignore’ file.
3. To setup the p4ignore file, we will open the .p4ignore file in notepad and add some text to it. I have created a comprehensive .p4ignore file, based lightly on the .gitignore from the official Unreal Engine 5 source repository from Epic Games.
# Custom .p4ignore for Unreal Engine Projects
# --------------------------------------------------

# Unreal Engine specific directories
# ----------------------------------
Saved/
Intermediate/
LocalBuilds/
*/Intermediate/*
*/Saved/*
Engine/Intermediate/*
Engine/DerivedDataCache/*
Engine/Programs/UnrealBuildTool/*
Engine/Programs/*\Intermediate\*
Engine/Programs/*\Saved\*
Engine/Documentation/*

# Build outputs and intermediates
# -------------------------------
Binaries/
Engine/Binaries/*
*/obj/*
/Binaries/*
/Intermediate/*
/Build/Receipts/*
/DerivedDataCache/*

# Visual Studio specific files
# ----------------------------
/*.sln  # Only root .sln files
*.suo
*.user
*.csproj.*
*.csprojAssemblyReference.cache
.vs/*
/Engine/Programs/UnrealBuildTool/*.txt
/Engine/Programs/UnrealBuildTool/*.xml

# Xcode specific files
# --------------------
*.xcworkspace
*.xcodeproj
*.hmap
*.ipa
*.dSYM.zip
*.dSYM

# Linux and Mac specific files
# ----------------------------
*.sym
*.debug
*.user
*.pro
*.pri
*.kdev4
.DS_Store

# Temporary and backup files
# --------------------------
*.opensdf
*.sdf
*.tmp
*.mdb
*-Debug.*
/FileOpenOrder/
*~
crashinfo--*

# Python cached files
# -------------------
*.pyc

# Source control and configuration
# --------------------------------
.git/*
.p4sync.txt
p4config.txt

# Other build and temporary files
# -------------------------------
*.vcxproj
*.exe.config
*.exe.manifest
.ue4dependencies
Samples/*
FeaturePacks/*
*.target.xml

# Unreal Engine Derived Data Cache (Various formats)
**/DerivedDataCache/Boot.ddc
**/DerivedDataCache/**/*.udd
Engine/DerivedDataCache/*

# Unreal Engine Build Receipts
Engine/Build/Receipts/*

# Ignore documentation generated for C# tools
Engine/Binaries/DotNET/AutomationScripts/BuildGraph.Automation.xml

# Ignore version and exp files in the Engine/Binaries directory
/Engine/Binaries/**/*.version
/Engine/Binaries/**/*.exp

# Ignore Swarm local save files
Engine/Binaries/DotNET/SwarmAgent.DeveloperOptions.xml
Engine/Binaries/DotNET/SwarmAgent.Options.xml
Save and close the .p4ignore file and confirm that it’s listed in the workspace tab. If it’s not listed, click the Refresh button.
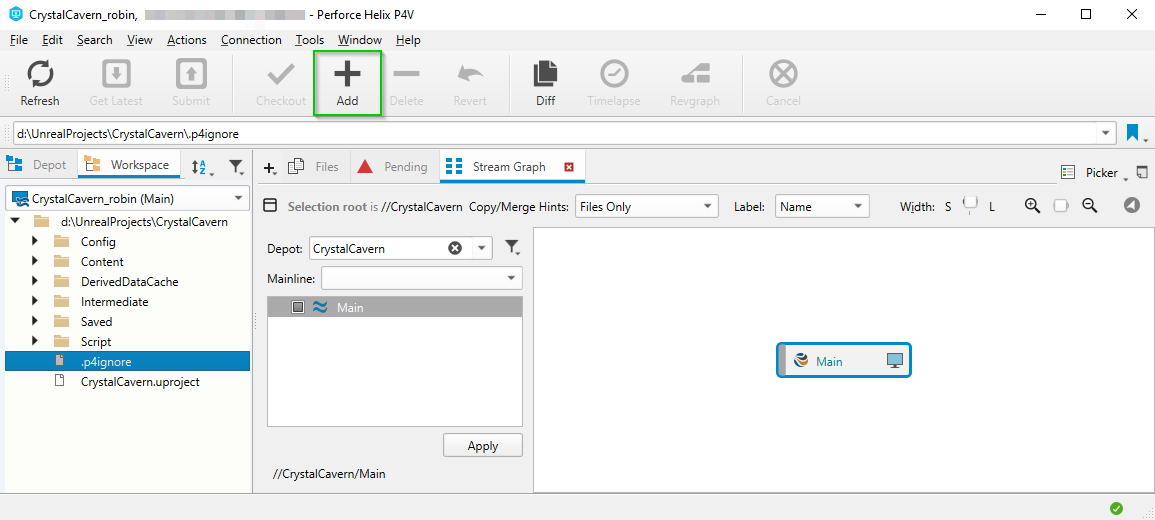
4. Add the .p4ignore file to the repository by selecting it in the workspace tab and clicked the +Add button in the top toolbar of P4V.
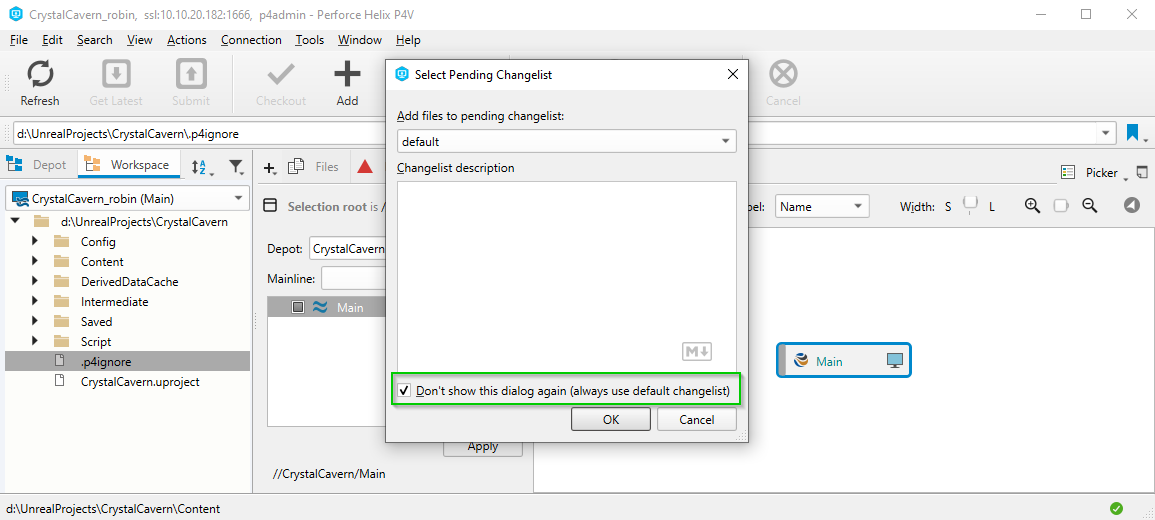
If you receive a pop up window to select a changelist, check the box to not show the dialogue again and click OK.
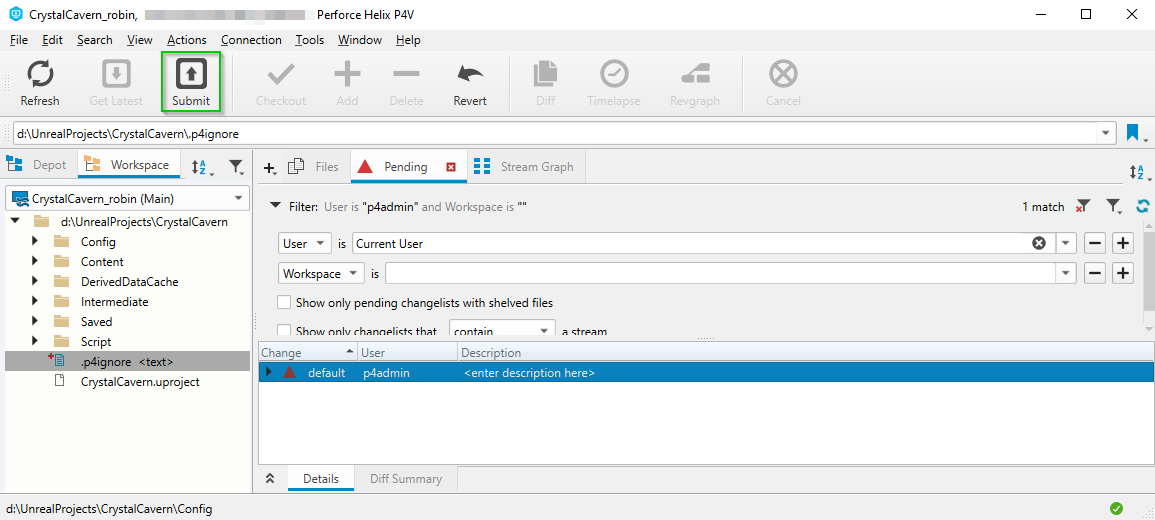
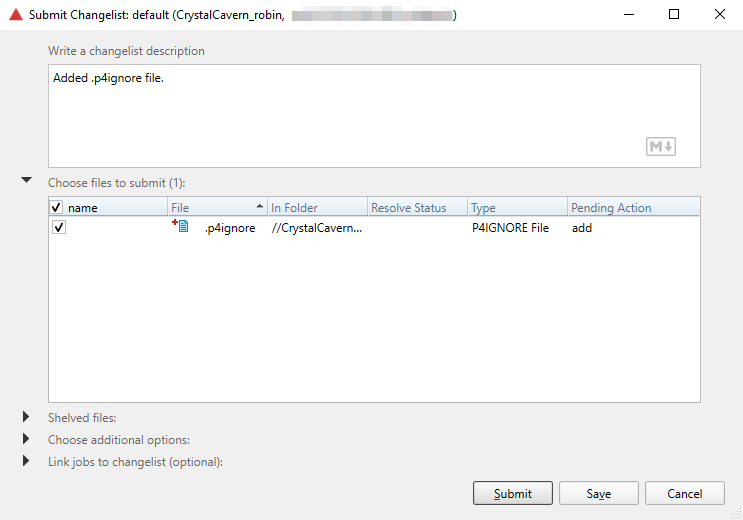
5. Select the Pending tab then click the Submit button or press CTRL+S.
Write a brief description such as “Added .p4ignore file.” then click Submit.
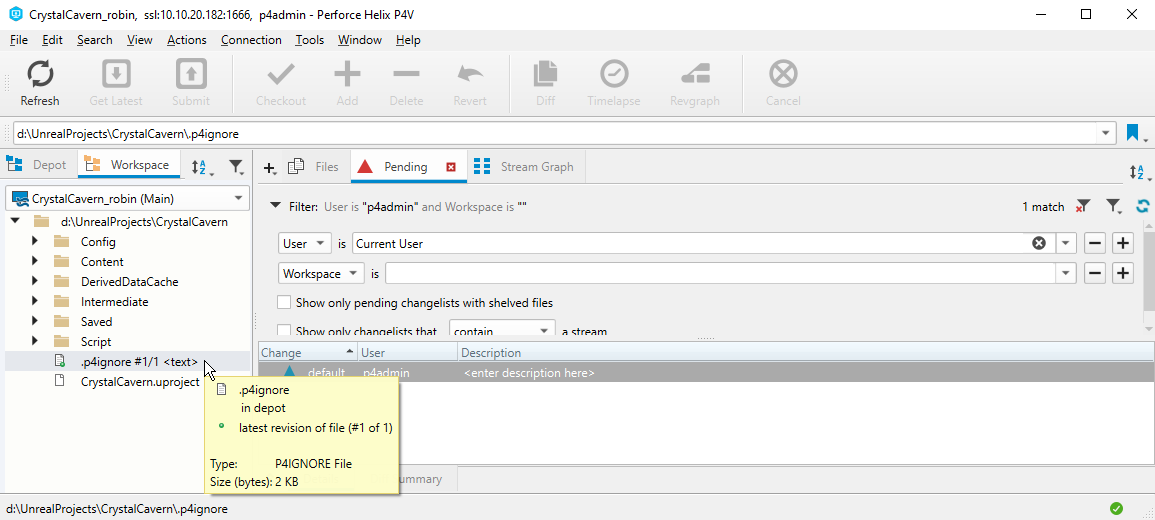
6. Now that the .p4ignore file has been added to the depot, hover the mouse cursor over it and you can see that it has the following attributes:
In depot
Latest revision of file (#1 of 1)
Green marker on the file icon.
Important: Even though the .p4ignore file is now stored in the repository, every user who gains access to the repository will need to run the p4 set P4IGNORE=.p4ignore command in an elevated Cmd or PowerShell window.
p4 set P4IGNORE=.p4ignore
Adding UE Project Files to Helix Core
Now that we have the depot, workspace and .p4ignore file set up and configured, we can add out Unreal Engine profile files to our Helix Core repository. Currently the project files only exist locally on the current workstation, so we need to add them to the remote repository.
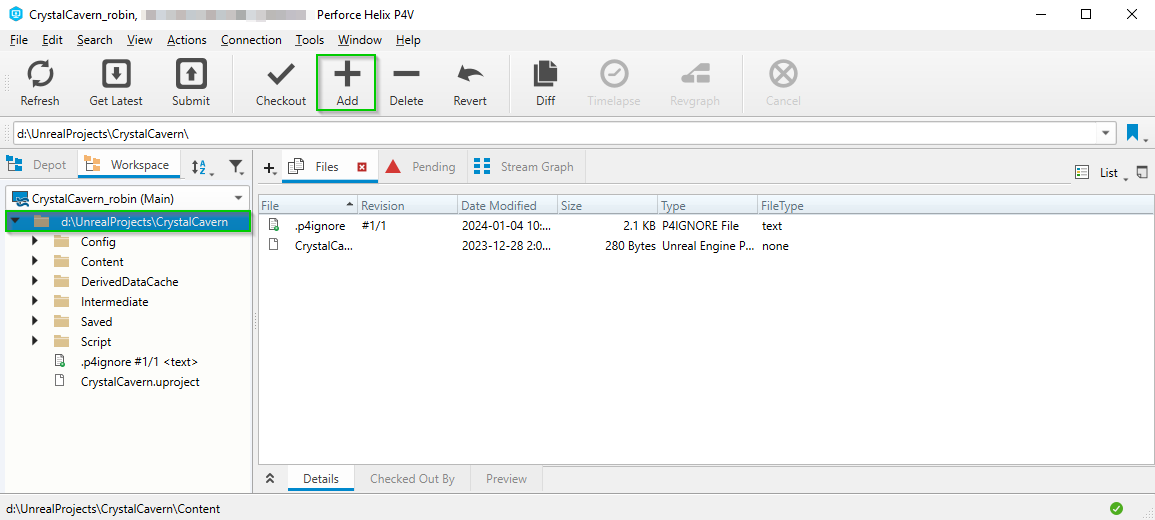
1. Open P4V, open the workspace tab, select your root workspace, and click the Add+ button.
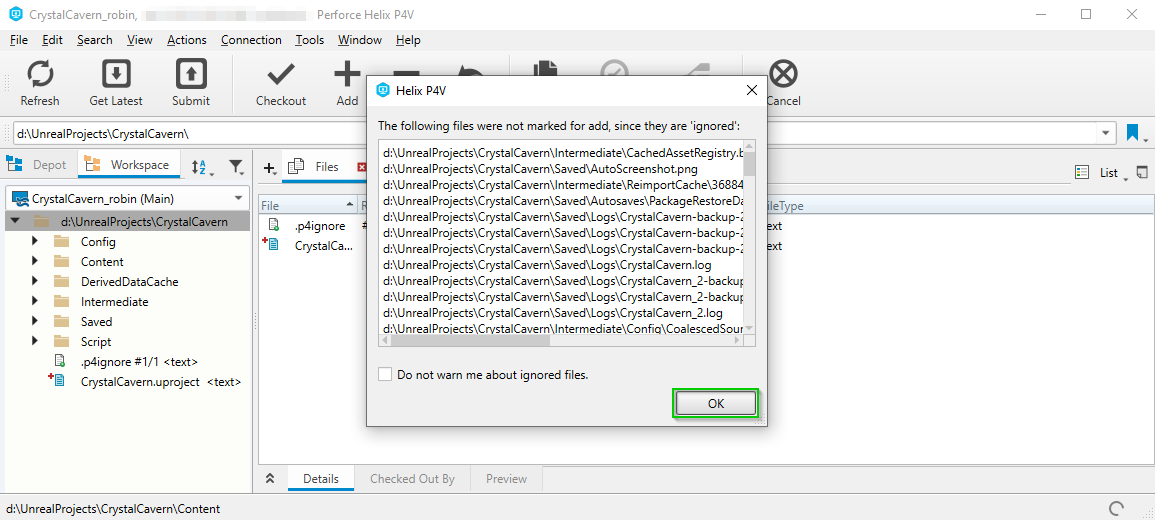
If you get prompted that files were not marked for add, since they are ignored, click OK. Optionally, you can select the checkbox that says Do not warn me about ignored files.
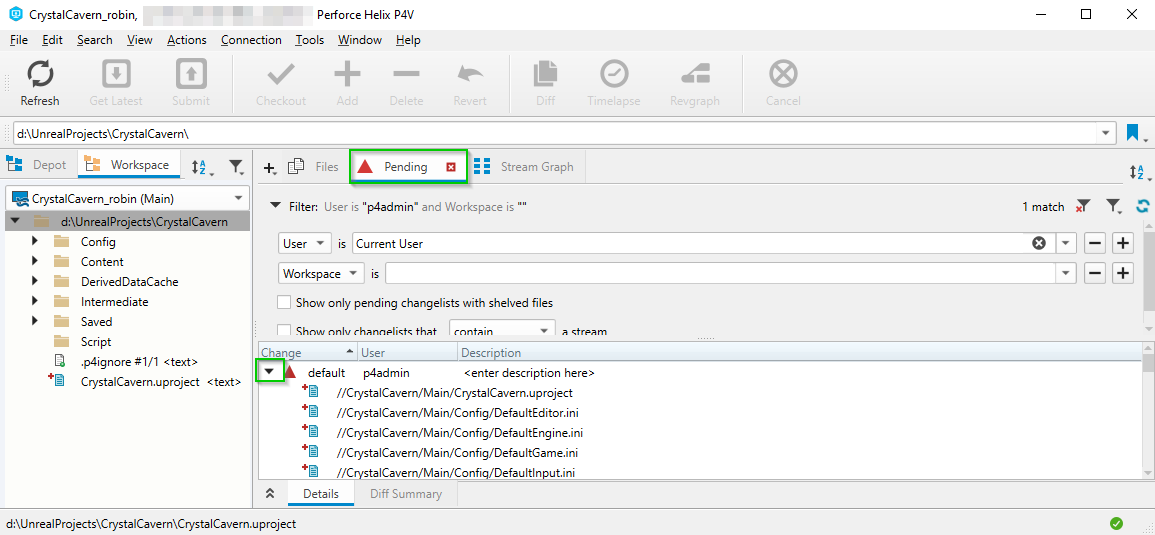
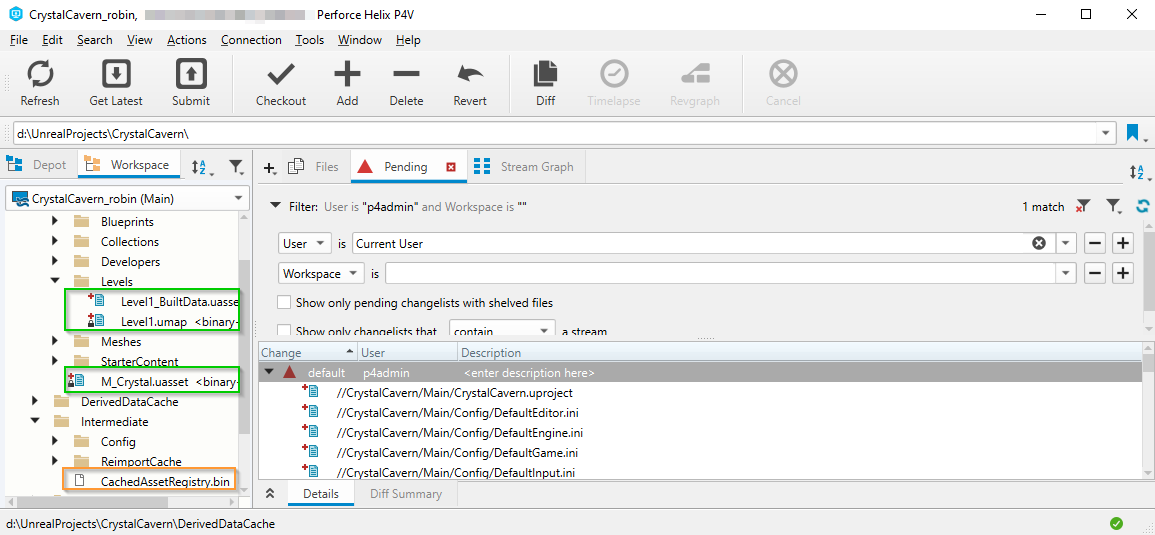
Navigate to the Pending tab, and click the black arrow to expand the list of pending files. Here you can view all of the files that we are adding to the Helix Core server.
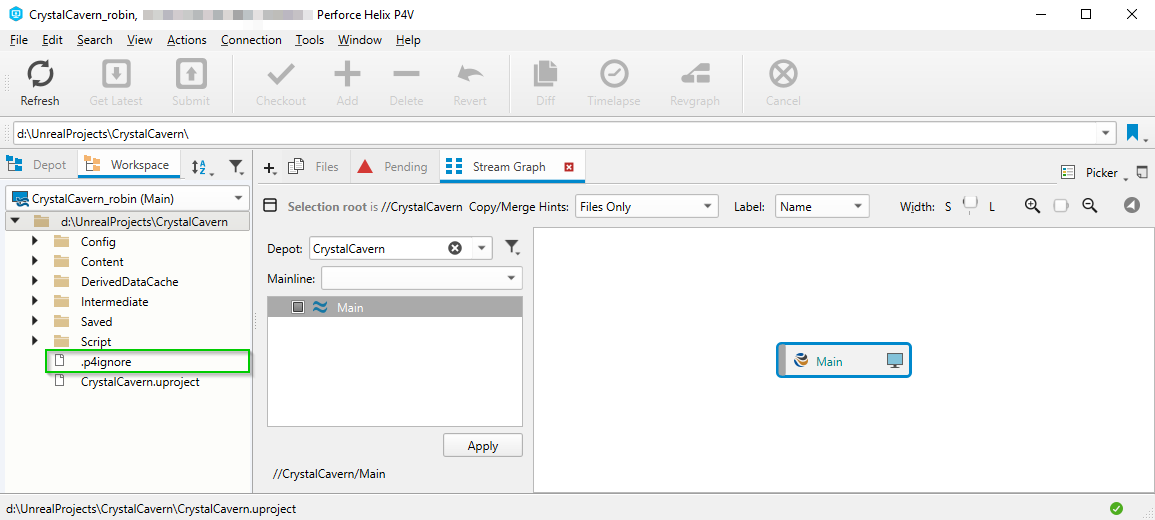
Before checking the files in to the repository, we can check which files are being tracked and which files are being ignore, by browsing the workspace tab. For example, you can see that in the screenshot below, files within the Content directory of our UE5 project (highlighted in green) have a red + symbol next to them, while files in the Intermediate directory (highlighted in orange) have a white icon, since we specified that everything in this directory should be ignored in the .p4ignore file.
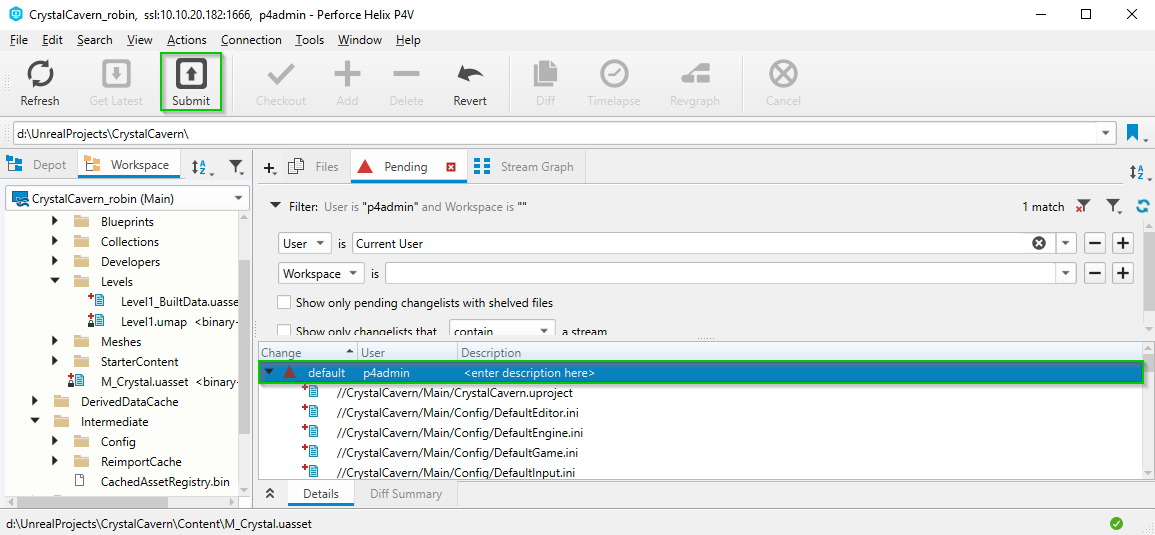
2. We are now ready to submit our pending project files and transfer them to the Helix Core server. Select the default changelist in the pending tab, and click the Submit button.
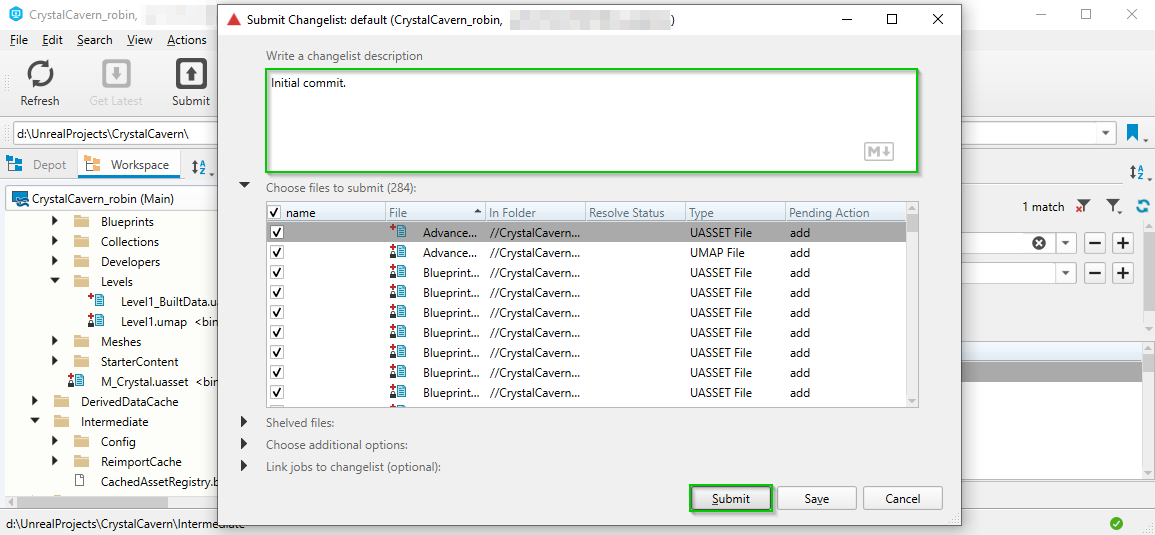
The final step is to enter a commit message in the new window and click Submit.
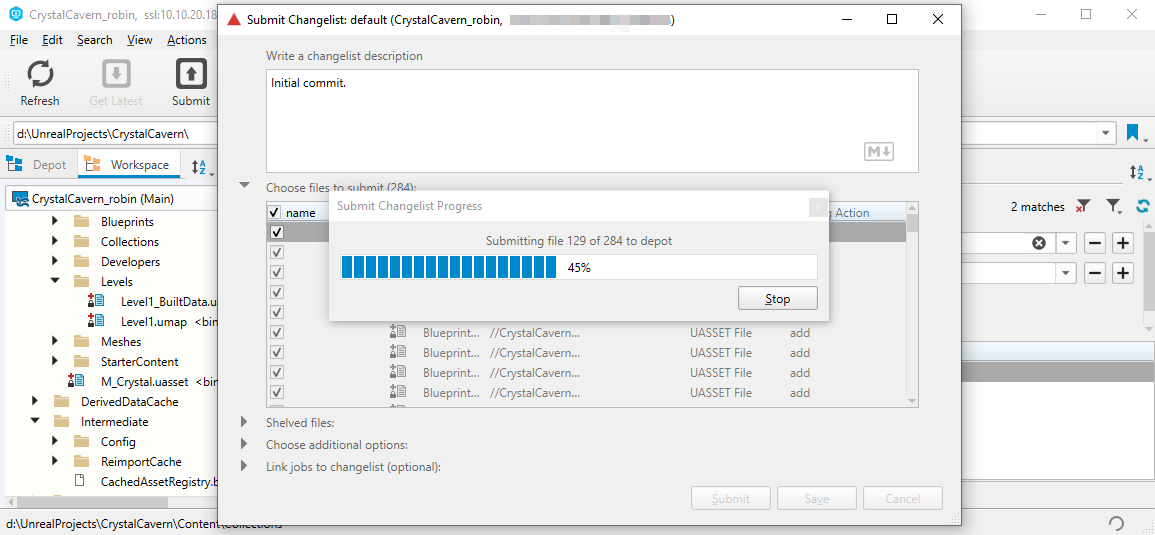
Now, all we need to do is wait patiently for the local files to upload to the server. This could take a few minutes depending on the size of the project. server specs, network and storage speed, etc…
Configuring Unreal Engine 5
Open Your Project: Launch Unreal Engine 5 and open your project.
Enable Source Control: Go to 'Tools' > 'Connect to Revision Control'.
Choose Provider: Select ‘Perforce’ as the source control provider.
Enter Connection Details: Input your Perforce server connection details, workspace name, and user credentials. Note: You might need to prefix your server IP Address with ssl: — Example: ssl:192.168.100:1666
Connect: Click ‘Accept Settings’ to connect UE5 to your Perforce server.
Working with Files
Checking Out Files: To modify a file, you must check it out from Perforce. This tells the system and your team that you’re making changes to that file.
Submitting Changes: Once you’ve made changes, submit them back to the server. This records the changes and makes them available to other team members.
Reverting Changes: If you need to discard changes, you can revert to the last submitted version.
Best Practices
Regular Commits: Frequently submit your changes to avoid conflicts and ensure your work is backed up.
Descriptive Comments: Always add meaningful comments to your submissions to provide context for your team.
Stay Updated: Regularly sync your workspace to get the latest changes from the server.
Conclusion
Integrating Unreal Engine 5 with Perforce Helix Core sets a solid foundation for managing your game’s development process. It facilitates teamwork, keeps your assets safe, and ensures a smooth workflow even as your project scales. By following the steps outlined in this guide, you’re well on your way to a more organized and efficient game development lifecycle.
Remember, every team’s needs are different, so feel free to adapt these practices as you see fit. Happy developing!
Note: Always ensure you have the correct permissions and follow your organization’s guidelines when setting up and using version control systems.
In the realm of game development, efficient and realistic lighting plays a pivotal role in creating immersive environments. Unreal Engine 5 introduces the GPU Lightmass plugin, revolutionizing the process of light baking by harnessing the power of hardware-accelerated ray tracing. This guide, designed by Lost Crow Dev, walks you through optimizing your lighting build process in Unreal Engine 5, utilizing the GPU Lightmass plugin. From setup to execution, this document will provide detailed instructions to ensure you leverage this technology effectively, catering to both aesthetic quality and time efficiency.
GPU Lightmass Plugin
The GPU Lightmass plugin in Unreal Engine 5 is a groundbreaking tool that significantly enhances the light baking process by utilizing the GPU’s capabilities. This plugin is designed to compute light interactions more efficiently than traditional CPU-based methods, resulting in quicker build times and higher-quality lighting effects.
Pros:
Enhanced Speed: Leveraging GPU power for faster lightmap baking.
Superior Quality: Achieves more realistic lighting and shadow details.
Cons:
Hardware Requirements: Only compatible with GPUs supporting hardware-accelerated ray tracing:
Nvidia: RTX 20 series or newer.
AMD: RX 6000 series or newer.
Intel: Intel Arc GPUs (no integrated GPUs).
Apple Silicon: M3 Macs and above.
High VRAM Necessity: More VRAM equates to faster processing speeds.
Performance Variability: Efficiency varies based on the GPU model and specifications.
Follow along with this step-by-step guide to optimize your lighting build process in Unreal Engine 5 using the GPU Lightmass plugin.
Steps for Faster Building Lighting in Unreal Engine 5
Disable Lumen:
Navigate to Project Settings -> Search Lumen.
Under “Global Illumination, Dynamic Global Illumination Method,” select None.
Under “Reflection Method,” set it to Screenspace.
Enable GPU Lightmass Plugin:
Go to Edit -> Plugins.
Enable GPU Lightmass (beta).
Note: Don’t restart the editor yet.
Enable Hardware Ray Tracing:
Navigate to Edit -> Project Settings.
Search for Hardware Raytracing.
Enable Support Hardware Ray Tracing.
Restart the editor now.
Access GPU Lightmass:
Go to Build -> GPU Lightmass.
This opens a new tab “GPU Lightmass”.
Configure GPU Lightmass Settings:
Generally, default options suffice.
Key Settings to Consider:
Disable Viewport Realtime is ON for faster builds.
Choose Mode: Full bake for entire level or Bake what you see for viewport-specific baking.
Keep Compress Lightmass enabled for reduced size with minimal quality loss.
Prepare Lighting:
Lights must be set to Static or Stationary.
Only four overlapping Stationary lights are allowed.
Movable lights are not baked.
Building the Lighting:
Click Build Lighting.
Confirm mesh upgrade if prompted.
Wait for the building process to complete.
Check Lightmap Data:
Navigate to Lit -> Optimization View Modes -> Lightmap Density.
Color Coding: Green = Perfect, Blue = Good, Red = Bad.
Adjust lightmap resolution for red areas by doubling the value in the Override Light Map Res setting under lighting properties.
Conclusion
This comprehensive guide provides a clear path for utilizing the GPU Lightmass plugin in Unreal Engine 5 to build lighting faster. It’s crucial to consider the hardware requirements and settings adjustments to optimize the lighting building process for your specific project needs.
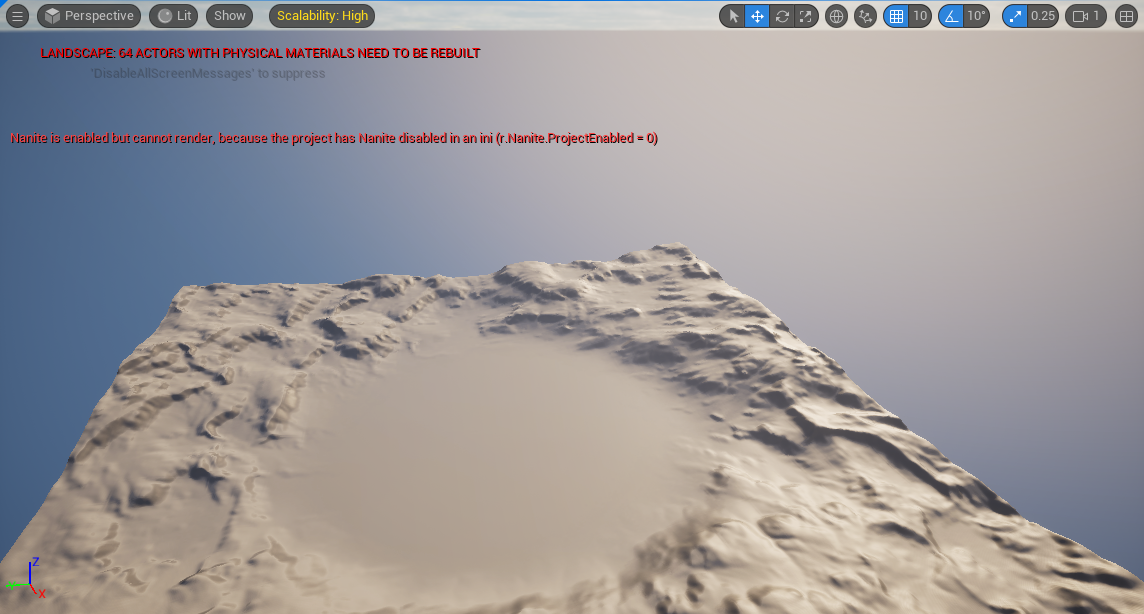
Nanite is Unreal Engine 5’s revolutionary virtualized geometry system, enabling incredibly detailed environments and objects. However, there are situations where game developers might need to disable Nanite, such as compatibility issues or specific design choices. This guide will walk you through the process of how to disable Nanite in Unreal Engine 5 and resolve the common error: “Nanite is enabled but cannot render, because the project has Nanite disabled in an ini (r.Nanite.ProjectEnabled = 0).”
Introduction
To disable Nanite in Unreal Engine 5:
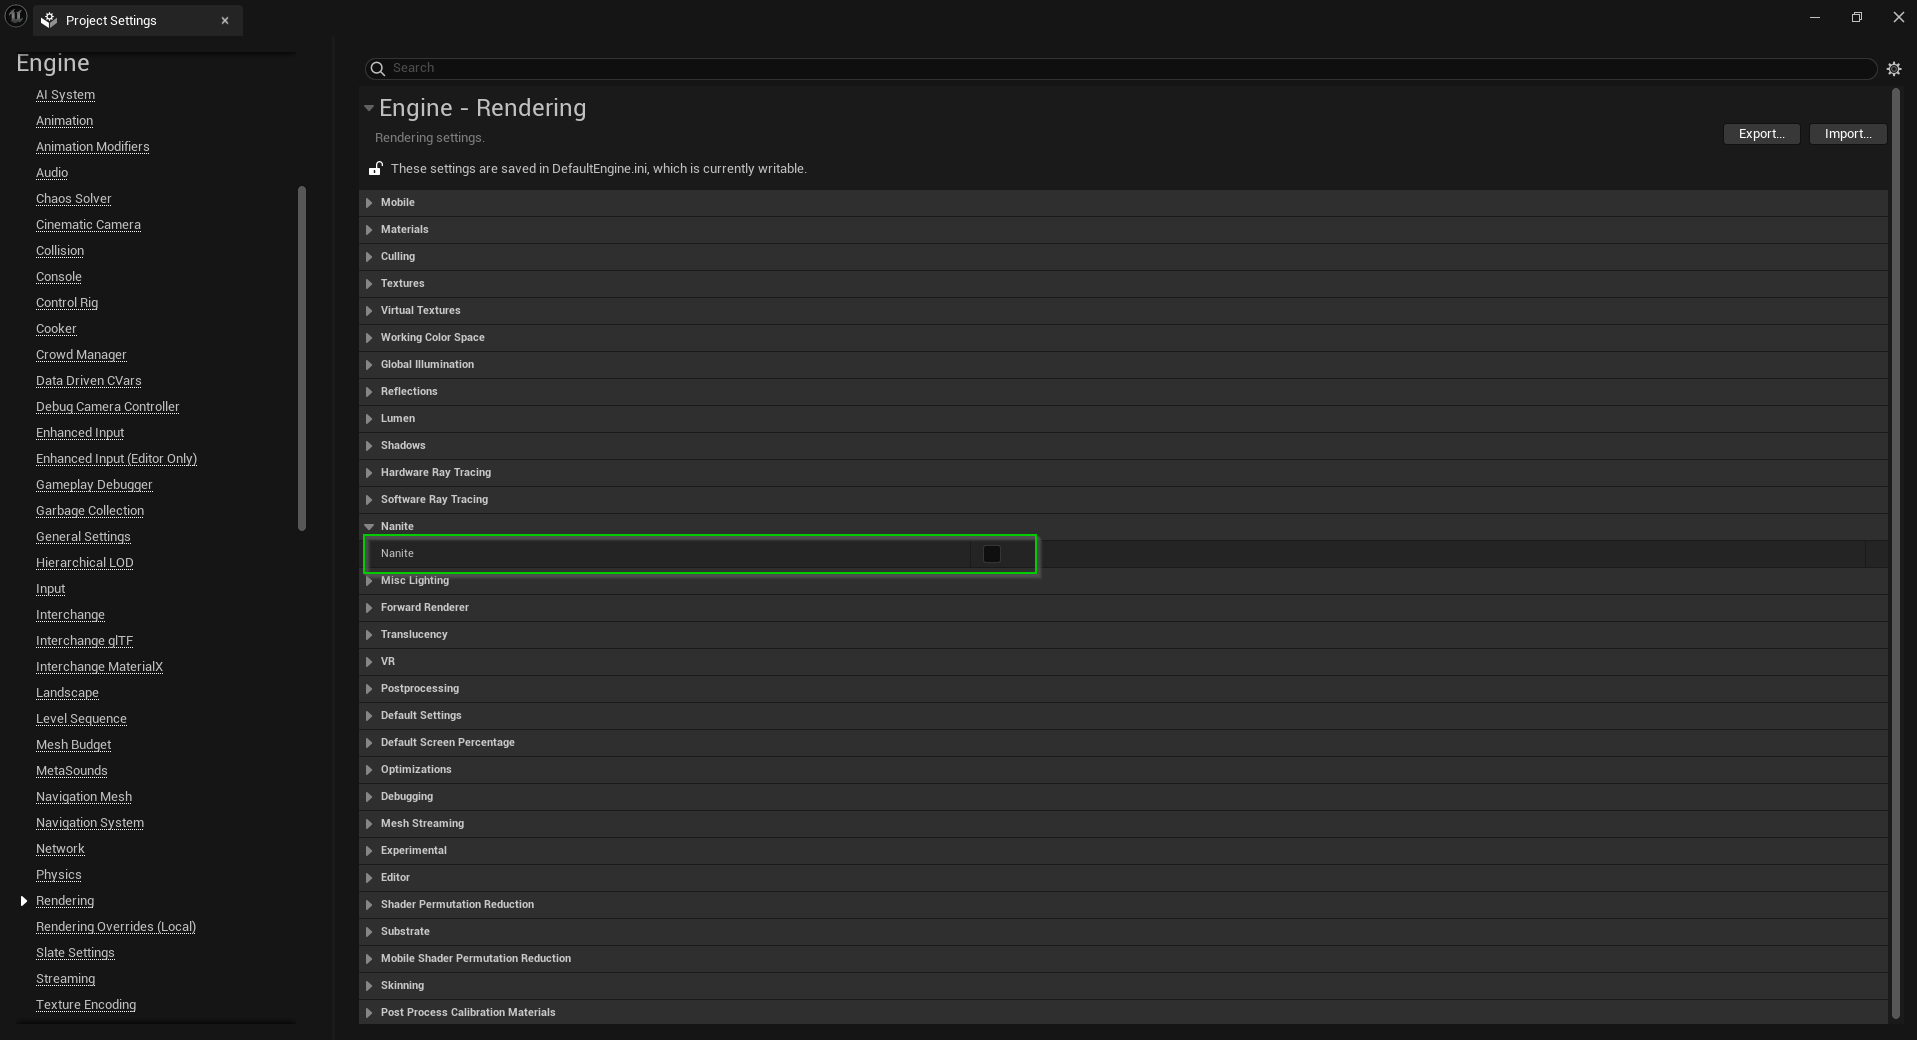
Go to Edit -> Project Settings.
Navigate to Engine -> Rendering.
Find the Nanite section and uncheck it to disable.
Alternatively, you can search for Nanite in Project Settings and disable it.
Resolving the Nanite Error
Once Nanite is disabled, you might encounter an error stating that Nanite is enabled but cannot render. Here are three ways to fix this issue:
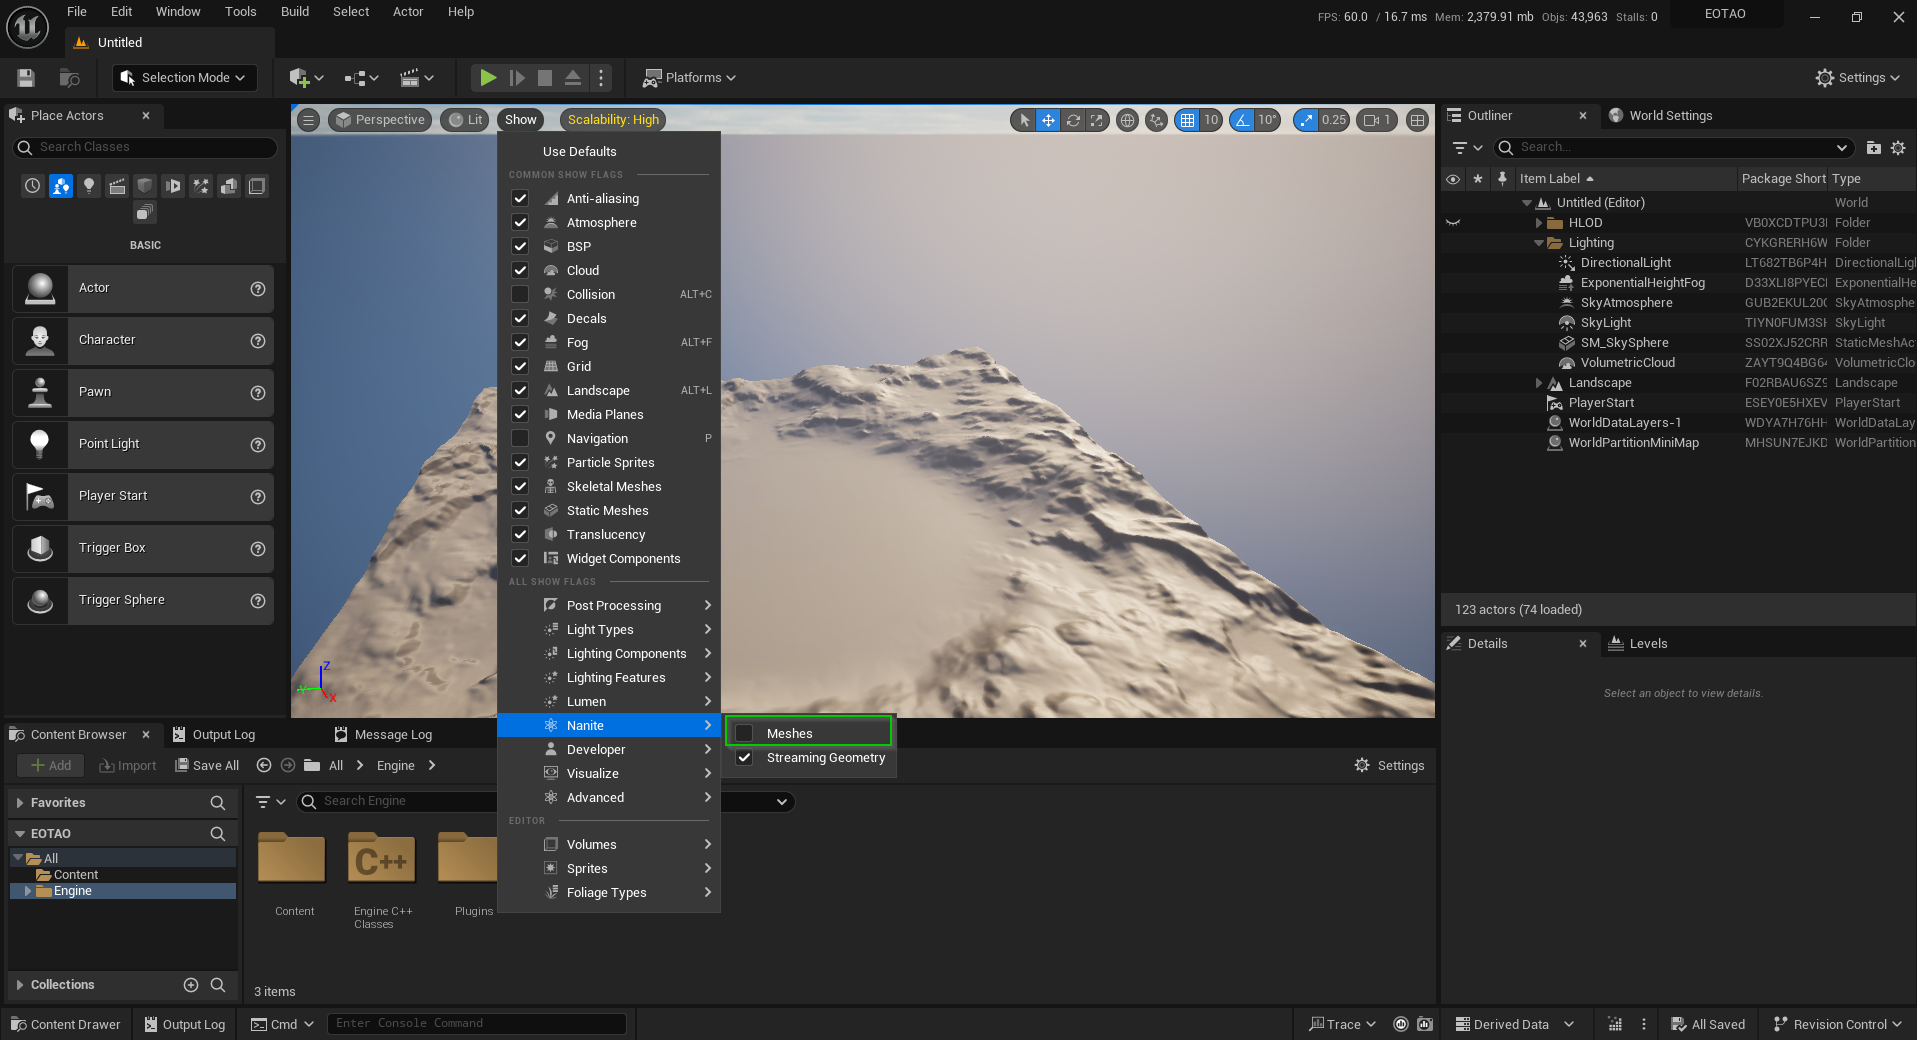
Method 1: Disabling Nanite Meshes in the Viewport
Open Unreal Engine 5.
In the viewport, click on Show.
Navigate to Nanite and uncheck Meshes.
This method disables the Nanite Meshes visualization, resolving the error in the editor window. Unfortunately with this method, the error message will appear when you play your game in the editor.
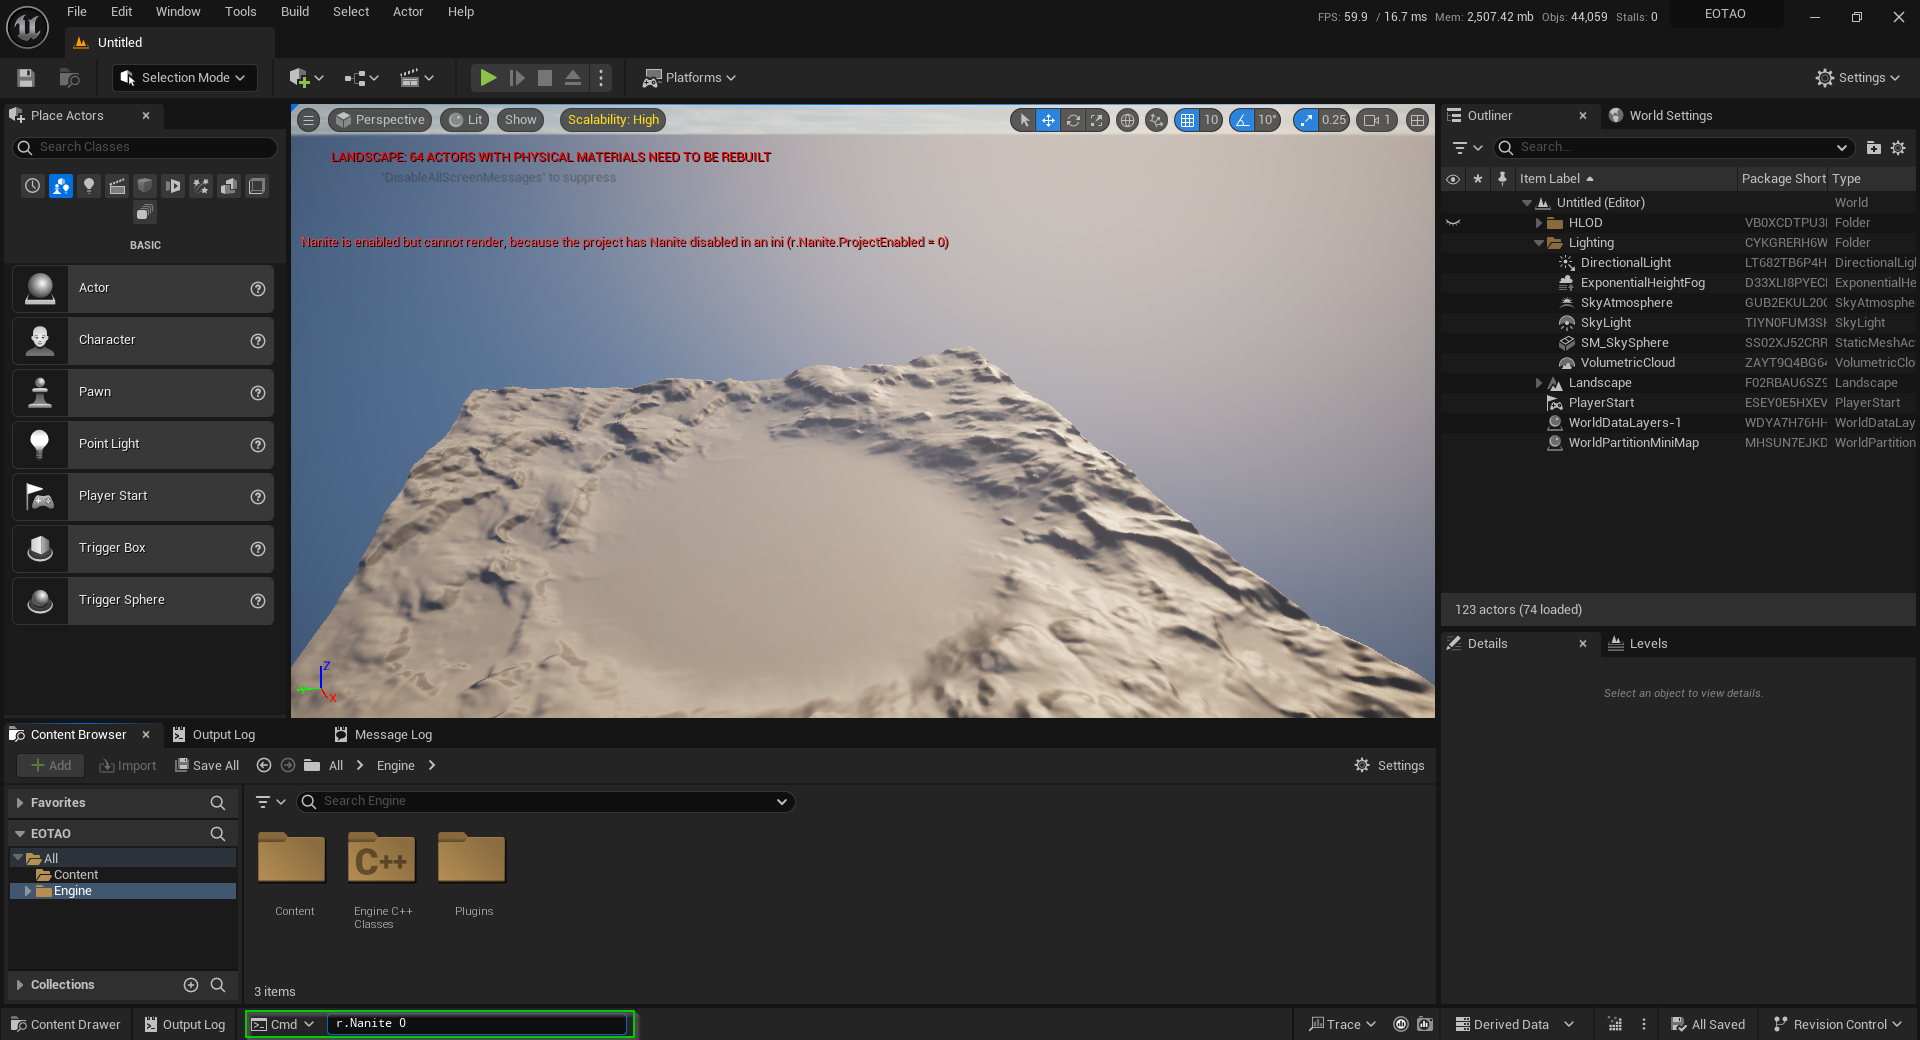
Method 2: Using Command Console and Editing DefaultEngine.ini
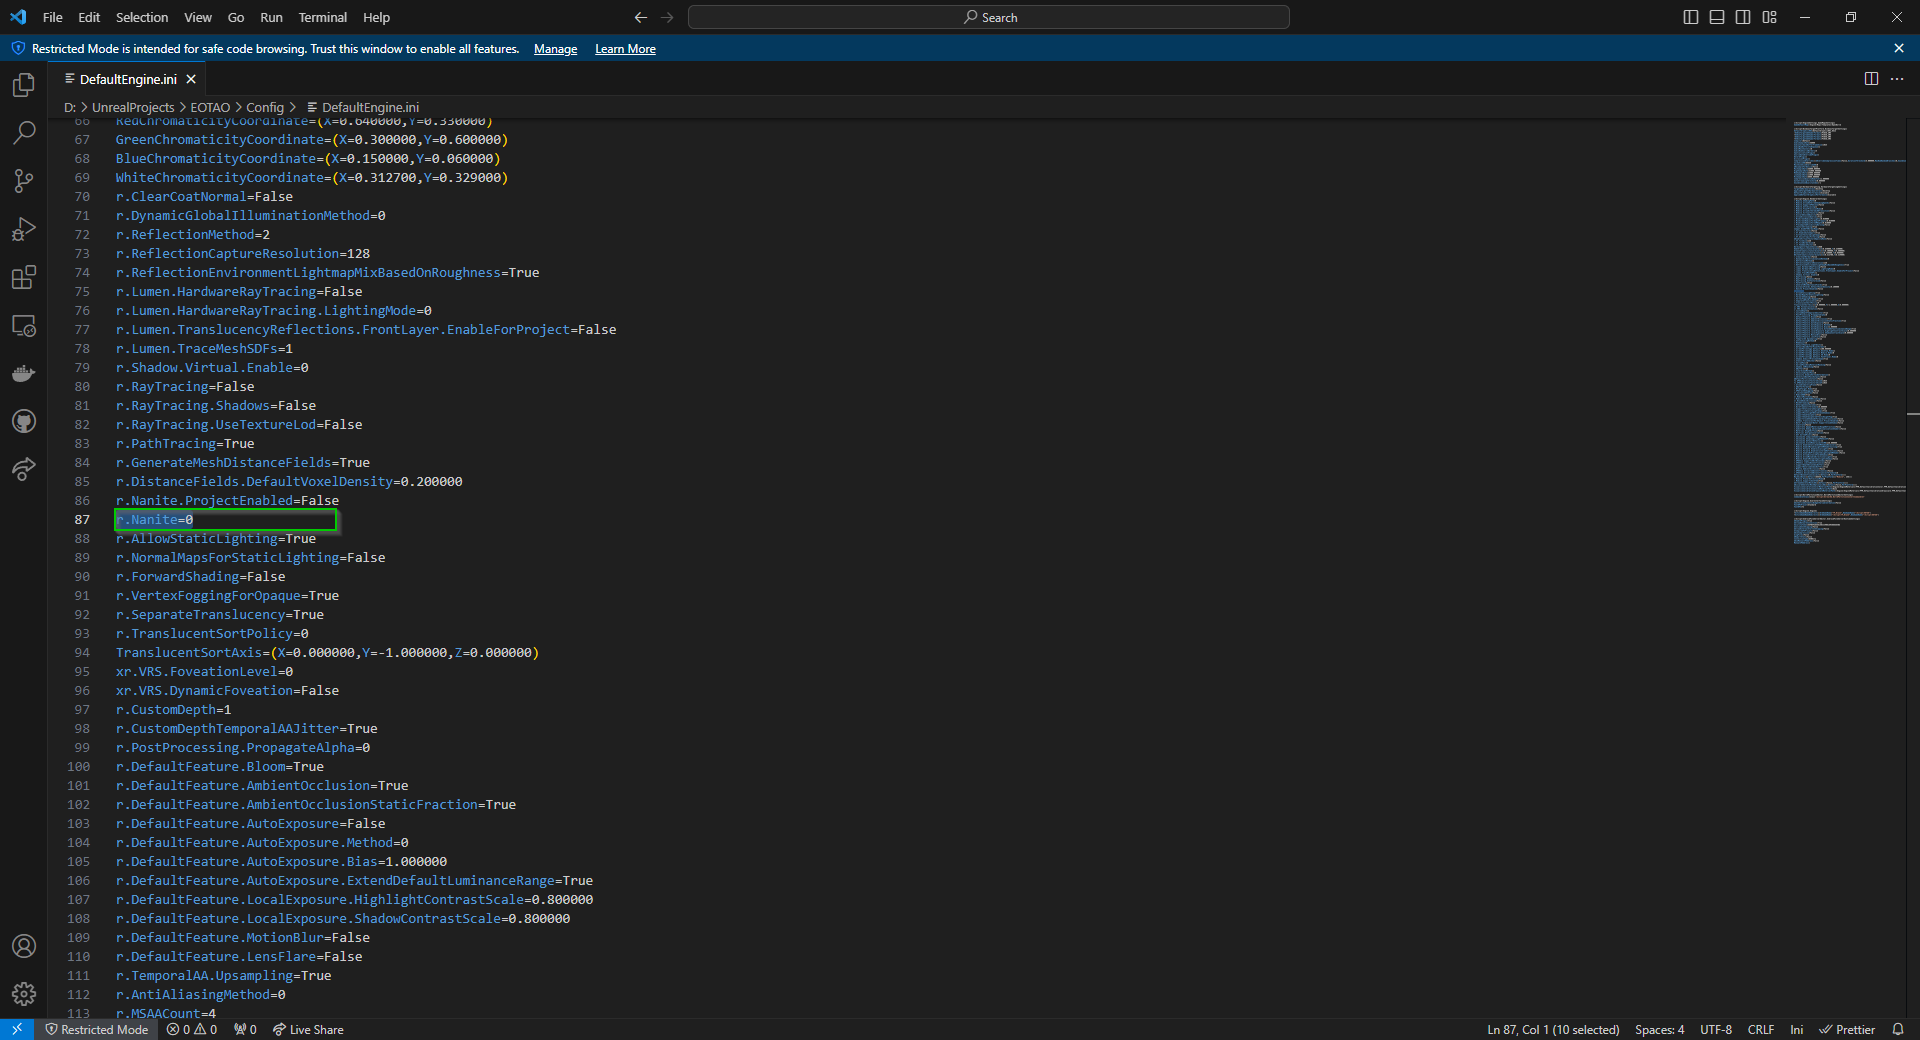
In Unreal Engine 5, locate the Cmd textbox at the bottom of the screen.
Enter the command r.Nanite 0. Note that this command needs to be run every time you relaunch the editor.
To make this change permanent:
Navigate to your project’s root directory.
Open the Config folder and find DefaultEngine.ini.
Add the following line under r.Nanite.ProjectEnabled=False:
r.Nanite=0
This method permanently disables Nanite, eliminating the need to use the command every time.
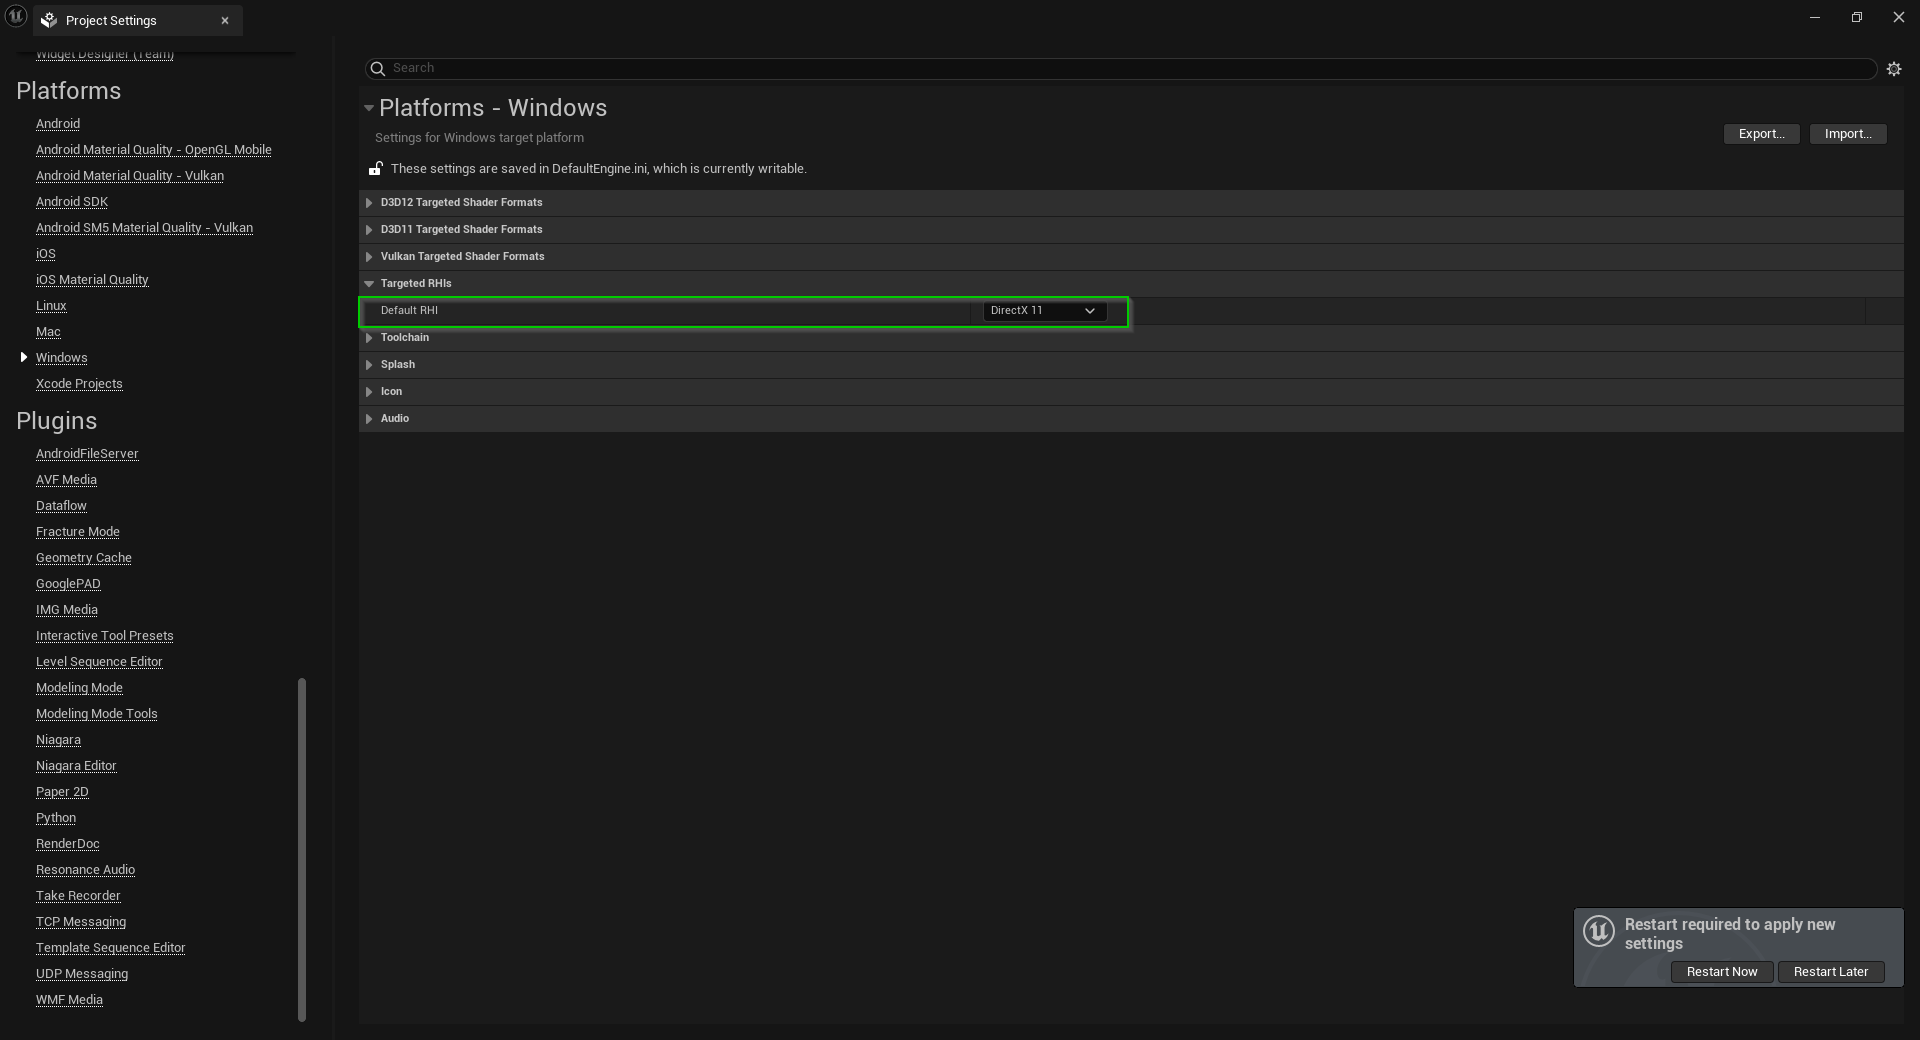
Method 3: Switching to DirectX 11
In Unreal Engine 5, go to Edit -> Project Settings.
Navigate to Platforms -> Windows.
Under Targeted RHIs, change Default RHI to DirectX 11.
Alternatively, search for DirectX in project settings and select DirectX 11.
Note: Switching to DirectX 11 will cause you to lose DirectX 12 features and optimizations. It’s important to research the implications of this change. Generally, DirectX 12 may perform better, especially on higher-end GPUs, while DirectX 11 might offer slight improvements on lower-end hardware.
Conclusion
Disabling Nanite in Unreal Engine 5 can be crucial for certain projects, especially those targeting specific hardware or design requirements. By following these methods, you can effectively disable Nanite and resolve any related errors, ensuring a smoother development process. Remember to consider the trade-offs when switching rendering technologies and always test your project thoroughly after making such changes.
Creating immersive environments in Unreal Engine 5 (UE5) requires mastery over various rendering settings, one of which is auto exposure or eye adaptation. This feature simulates the human eye’s adjustment to different levels of light, but there are scenarios where a developer may want to disable it to achieve consistent lighting. Here are three ways to disable auto exposure in UE5:
1. Post Process Volume
Auto exposure can be disabled through a Post Process Volume. By adding a Post Process Volume to your level, you can manually adjust exposure settings. To disable auto exposure, set the Min Brightness and Max Brightness values under the Auto Exposure settings to the same value. This effectively prevents the engine from making any adjustments to the exposure based on lighting changes.
2. Project Settings
For scenarios where a Post Process Volume isn’t present or you want to disable auto exposure globally, you can modify the project settings.
Navigate to Edit -> Project Settings, then search for “exposure”.
Within the settings, you should find options to disable auto exposure across your entire project. This method ensures that auto exposure is turned off regardless of individual level settings.
3. Min/Max EV100 Values (UE5.1+)
In versions UE5.1 and later, the process slightly differs due to updates in the rendering engine. Instead of using Min/Max Brightness, you now have to use Min/Max EV100 values to control the exposure. Set both values to the same number to disable auto exposure, ensuring a consistent exposure across your scenes.
Each of these methods serves different needs: Post Process Volume allows for scene-specific control, Project Settings offers a global solution, and Min/Max EV100 values provide a modern approach in later versions of UE5. By leveraging these settings, developers can gain complete control over the lighting and exposure of their environments, leading to the exact visual feel they are aiming for.
Unreal Engine 5 (UE5) is packed with features that can enhance your game development process. By tweaking a few settings and utilizing some handy plugins and shortcuts, you can significantly streamline your workflow. Let’s dive into some of these time-savers that you should consider enabling for every project.
Editor Preferences
Start by customizing your editor preferences to suit your workflow. You can access these preferences from the ‘Edit’ menu in the toolbar.
Open Editors in New Tab / Window
To avoid clutter and keep your workspace organized, enable ‘Open Editors in New Tab / Window’. This setting allows each of your assets to open in a new tab instead of replacing the current view.
Blueprints Workflow
Blueprints are an integral part of UE5, and a few shortcuts can make working with them much smoother.
Disabling and Re-Enabling Blueprint Nodes
If you need to disable a blueprint node temporarily, simply press “D” when the node is selected. To re-enable it, the default key is “E”. You can change these keys to your preference in the ‘Blueprint Editor’ section of the editor preferences.
Navigating Your Scene
Quickly move around your scene with these navigational shortcuts.
Bookmarks
To save a camera position, press CTRL + [any number key] (excluding the numpad). To return to this position, just press the corresponding number key.
Actor Palette
The Actor Palette is a tool developed by Epic Games that simplifies the process of adding objects to your scene.
Enabling Actor Palette
You can enable this feature from the ‘Plugins’ menu. Once activated, you can drag and drop actors from your loaded levels into your current scene, which is incredibly convenient for populating your game world with prefabricated objects.
Modeling Plugin
The Modeling plugin in UE5 is a powerhouse that extends your creative capabilities within the engine.
Getting Familiar with Modeling Tools
To enable the Modeling plugin, go to the ‘Plugins’ menu and search for ‘Modeling’. Once enabled, you’ll have access to a suite of tools that can handle a variety of modeling tasks right inside the engine.
Scene Lighting
Adjusting the lighting of your scene is made easier with some hidden UE5 settings.
Adjusting EV100 Settings
Click on “Lit” in the viewport’s top left corner, select “Game Settings”, and then adjust the EV100 scale. This allows you to fine-tune the brightness of your scene without going into detailed light settings.
Animation Workflow
UE5 introduces features that simplify animation workflows.
Replace Skeleton
With the ‘Replace Skeleton’ feature, you can swap skeletons for animations. This can be a lifesaver, especially for those who find the retargeting system challenging to navigate.
Blueprint Aesthetics
Keeping your blueprints organized can help in maintaining and understanding your project.
Reroute Mode and Comments
Use reroute nodes and description comments to keep your blueprints neat. The reroute mode can be activated from the right-click context menu within the blueprint editor.
Debugging and Optimization
UE5 comes with tools to assist in debugging and optimizing your game.
Visual Logger
The Visual Logger is an essential tool for debugging. It can be enabled from the ‘Window’ menu and helps track events and states within your game.
Essential Practices
Lastly, one setting you should always have enabled is auto-saving.
Auto Save Feature
To enable auto-saving, go to ‘Editor Preferences’ and set up your preferred auto-save intervals. This feature ensures you don’t lose progress and can quickly revert to previous versions if necessary.
By integrating these settings and shortcuts into your daily use of UE5, you’ll find your development process smoother and more efficient. For more detailed instructions and additional tips, check out the official Unreal Engine documentation and community forums, where you can find a wealth of knowledge shared by fellow developers.